Today we’re going to build an amazing HTML editor using Visual Studio Code (VS Code), a powerful, versatile cross-platform code editor that provides a lot of capabilities. Let’s get this out of the way up front: I’m a raving VS Code fan! In a previous post, I showed you how to Build an Amazing Markdown Editor, and now we’re going to learn how to create a fabulous HTML editor as well. Let’s get started!
Install Visual Studio Code
Go to the VS Code Downloads page to download and install the appropriate bits for your platform (i.e. Windows, Linux, or OS X). If you already have VS Code installed, be sure you update your copy to the latest version by going to Help | Check For Updates… from the VS Code menu.
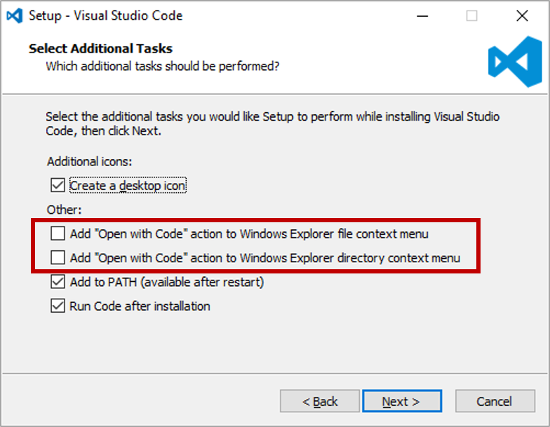
If you are installing VS Code for Windows, be sure to check the two checkboxes shown in the screenshot below. This will provide the ability to right click on a folder in Windows Explorer and launch VS Code. These checkboxes are not checked by default.
Familiarize yourself with VS Code Out-of-the-box HTML features
HTML Formatting
VS Code includes a number of built-in HTML features. Microsoft has created an excellent introductory article that we will build upon. Let’s explore these built-in HTML features as a first step in your journey to become a VS Code HTML editing pro.
First, create a folder called html (or name of your choice) that you can use to store your HTML files.
Next, right click on this folder and choose Open with Code. This will open Code for the entire folder rather than just for an individual file which is very handy for creating and editing many files in a given folder at once. If this feature is not available on your platform, open VS Code first, and then select File | Open Folder... and navigate to the html folder.
Create a file called index.html and add the following HTML exactly as it is written here with no indentation and with the extra vertical space between the paragraph (<p>) tags:
<html>
<head>
<title>My page title</title>
</head>
<body>
<p>Hello</p>

<p>world!</p>
</body>
</html>
Next, press Shift+Alt+F and VS Code will reformat your HTML to look much prettier. Very nice! (You can also highlight a selected area of text and reformat just the selected area.) Your document should now look something like this:
<html>

<head>
    <title>My page title</title>
</head>

<body>
    <p>Hello</p>

    <p>world!</p>
</body>

</html>
Alas, VS Code has indented the HTML tags to provide for easier reading; however, I prefer my HTML to be tighter without the extra vertical spacing. This is obviously a personal preference and you may opt for the extra vertical spacing. In case you want to change it, here are the steps:
From the VS Code menu, select File | Preferences | User Settings
Add the following contents between the curly braces (there may be other entries there already):
 "html.format.preserveNewLines": false,
 "html.format.extraLiners": ""
This is a JSON configuration file so make sure there is a comma after each entry with the exception of the last entry. Here’s what these settings accomplish:
- “html.format.preserveNewLines”: false (This makes our HTML tighter and removes the extra vertical space between HTML tags such as the vertical space between our paragraph tags in the sample above)
- “html.format.extraLiners”: “” (Use this to configure a list of tags, comma separated, that should have an extra newline before them. We enter “” so that no tags will have an extra newline before them.
After saving the changes you made to the user settings file, go ahead and reformat your HTML document again using Shift+Alt+F. Your HTML will now look much tighter:
<html>
<head>
    <title>My page title</title>
</head>
<body>
    <p>Hello</p>
    <p>world!</p>
</body>
</html>
Push it to the Limit with Emmet
VS Code supports Emmet snippets out of the box. As described on the Emmet website, “Emmet takes the snippets idea to a whole new level: you can type CSS-like expressions that can be dynamically parsed, and produce output depending on what you type in the abbreviation.” Let’s try a couple of examples:
Create a new file called index2.html and enter the following text:
html:5
After entering “html:5”, press the Tab key. Bam! VS Code expands this Emmet shortcut into an HTML 5 starting template with your cursor positioned to start typing under the body tag:
<!DOCTYPE html>
<html lang="en">
<head>
    <meta charset="UTF-8">
    <title>Document</title>
</head>
<body>

</body>
</html>
Next, between the two body tags, enter the following text and press the Tab key:
ul>li*5
This Emmet shortcut is expanded to create 5 <li> tags under the ul tag as follows:
    <ul>
        <li></li>
        <li></li>
        <li></li>
        <li></li>
        <li></li>
    </ul>
Emmet provides a very powerful shortcut syntax for writing HTML. See this Emmet cheat sheet to gain a deeper understanding of the full scope of Emmet’s capabilities.
Install HTML Snippets Extension
Let’s add some extensions to make VS Code an even better HTML editor. We’ll first start by adding the HTML Snippets extension written by Mohamed Abusaid to enable us to add basic HTML tags quickly. Here’s how to install this extension:
- Press Ctrl+P to launch VS Code Quick Open.
- Paste in the following text and press Enter:
ext install html-snippets - There will be several extensions listed. Tap the
Installbutton associated with the HTML Snippets extension. - After the installation completes, tap the
Enablebutton. - Restart VS Code when prompted.
To use the HTML snippets, press Ctrl+Space and you will be presented with a list of possible snippets. As an example of the elegance of this extension:
- Press
Ctrl-Space. - Type “a” to select the <
a>(anchor/hyperlink) snippet. - Press the Tab key.
- Your cursor will now be positioned to enter the hyperlink source link (URL). Enter a URL.
- Press Tab again and your cursor will be positioned to enter the text assocated with the URL.
- Press Tab again to move outside of the anchor element you created.
Add HTML Previewing Options
We would like to be able to preview the HTML we develop in a browser window. In this section, we will implement two methods to make this happen. The first method provides a quick preview and the second method provides continuous live preview feedback each time we save our HTML document.
Add Extension to View HTML Document in a Browser
The first option adds a simple, but useful, way of viewing the HTML we are creating in a browser window. We’ll use the View In Browser extension created by qinjia. To install, carry out the following steps:
- Press Ctrl+P to launch VS Code Quick Open.
- Paste in the following text and press Enter:
ext install view-in-browser - There will be several extensions listed. Tap the
Installbutton associated with the View in Browser extension. - After the installation completes, tap the
Enablebutton. - Restart VS Code when prompted.
To use the extension, simply press Ctrl+F1 and the default browser on your system will launch the current HTML page you are editing. It does not get much easier than this!
Add Extension to Use BrowserSync for Continuous Feedback
BrowserSync enables us to save changes to our HTML document and see those changes immediately reflected in a browser window rather than having to press Ctrl+R to refresh the browser window. It’s even more awesome in a multi-monitor configuration since you can edit your HTML on one monitor and see the browser results on another monitor.
We will install the excellent lite-server npm (Node.js) package created by John Papa to accomplish this goal. Here’s how we do it:
- Install Node.js from here if you do not already have it installed. This will install both Node.js and npm, the Node.js package manager which we will use in the next step.
- From VS Code, open a terminal session by typing
Ctrl+`(Ctrl + back tick character) - In the terminal, enter the following to install the
lite-serverpackage globally on your system:npm install -g lite-server
- Enter the following command in the terminal to start lite-server:
lite-server
- lite-server will start up and host your files using a server on localhost port 3000 (http://localhost:3000). Additionally, lite-server will launch your default web browser and take you to that location.
- Note: lite-server uses
index.htmlas the default document. Change the URL in your browser after it launches to the appropriate HTML file name. For example, if you have created an HTML file calledhome.html, enterhttp://localhost:3000/home.htmlin your browser address bar. - Make some changes to your HTML file in VS code and save those changes. You should see those changes reflected in your Web browser without needing to refresh the content. This is the power of BrowserSync in action!
Install HTML Linter
Finally, let’s add an HTML linter to make our HTML editor even more capable. Linters are used by programmers to check source code for programmatic and stylistic errors. It helps both proactively fix errors before they occur as well as enforce a standard style to help make the source more readable and maintainable. We’ll use the HTMLHint extension developed by Mike Kaufman to conduct static code analysis behind the scenes and provide linting suggestions for improving our HTML code.
Let’s first install the extension:
- Press Ctrl+P to launch VS Code Quick Open.
- Paste in the following text and press Enter:
ext install HTMLHint - There will be several extensions listed. Tap the
Installbutton associated with the HTMLHint extension. - After the installation completes, tap the
Enablebutton. - Restart VS Code when prompted.
Next, let’s see how it works. Create a new document called test.html, enter “html:5”, and press the Tab key to expand the Emmet HTML5 shortcut. You should now see the following contents:
<!DOCTYPE html>
<html lang="en">
<head>
    <meta charset="UTF-8">
    <title>Document</title>
</head>
<body>

</body>
</html>
Remove the opening “<body>” tag. HTMLHint will activate a green squiggly line under the closing body tag. Hover your mouse over this green squiggly line and you will see a message that indicates this tag must be paired with a start tag as shown here:
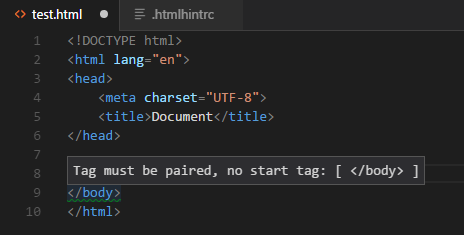
It’s great to have this extra guidance!
To modify the linting rules used by HTMLHint, create a file called .htmlhintrc in the root of your project directory containing your HTML files. Add the following rules as a starting point:
{
    "tagname-lowercase": true,
    "attr-lowercase": true,
    "attr-value-double-quotes": true,
    "doctype-first": true,
    "tag-pair": true,
    "spec-char-escape": true,
    "id-unique": true,
    "src-not-empty": true,
    "attr-no-duplication": true,
    "title-require": true
}
You can, for example, change the doctype-first value to false if you do not want to require an HTML doctype declaration at the top of your HTML documents. You will find a complete list of HTMLHint rules here.
Conclusion
Visual Studio Code provides solid HTML editing functionality out of the box. In this guide, we have taken it up several notches to create a very impressive HTML editor. You are now equipped and ready to create some awesome HTML pages in a highly productive fashion!
Follow @thisDaveJ (Dave Johnson) on Twitter to stay up to date on the latest tutorials and tech articles.
Additional Articles
Build an Amazing Markdown Editor Using Visual Studio Code and Pandoc
Visual Studio Code Jumpstart for Node.js Developers
Using Visual Studio Code with a Raspberry Pi (Raspbian)
Beginner’s Guide to Installing Node.js on a Raspberry Pi

I found this to be extremely helpful. As someone that wants to become a full stack developer this will help me become more productive. Thank you!
Albert, I appreciate your feedback. I wish you the best in your endeavors to become a full stack developer!
thank you very much, this is a complete tutorial about this tool
I am thinking of moving from Microsoft Expression Web to VS Code for creating websites. I have reservations because I don’t understand how to update many pages without the dynamic web template feature available in Expression Web. For example, changing business hours in the footer on the dynamic template, then saving it, updates all the pages attached to the template in one shot. Is this available in VS Code? If not, can you briefly explain how to do something like that without that feature?
Hi Dale – Expression Web has some features that are not going to be perfectly matched in VS Code. I’m not aware of a way to handle the dynamic web feature in VS Code out-of-the-box. The two ways I can think of to accomplish this are:
1. Use VS Code to write HTML. Use special symbols such as $businessHours$ in the footer. Write some code to do post processing of the HTML to convert all instances of $businessHours$ to the new business hours. The processed HTML would be saved to a separate location so you don’t overwrite your HTML containing the symbols. This method obviously requires coding.
2. (Preferred) Use server side include files to insert snippets of text in various locations. The technology employed depends on the server side web technology you are using on your hosting platform. For example, for PHP see this article. You could create a footer include file and reference this file on all of your HTML pages. To update business hours, simply update the one footer include file.
Thank you for this information.
Also, I just discovered that you can preview HTML pages in the browser simply by dragging the file’s tab in Visual Studio Code and dropping it on the Chrome window.
(This worked for me with Visual Studio Code 1.26.0 on Windows 10.)
Cool trick, Mike. Thanks for sharing!
very useful article.! great post
This all looked very promising to me, as I have some simple help single file htm editing I need, with a few small embedded images. I had started with Word (filtered htm), which was okay, but after embedding it would re-extract the images. At any rate, opening the (embedded) htm in VSCode immediately added a ton of � characters in it that look like � in a browser, so that made this whole approach useless to me. These characters were not present before (for example, looking at it in Notepad, or comparing before and after with BeyondCompare). And they were not a “format on save” issue either in VSCode.