Today we’re going to build an amazing Markdown editor using Visual Studio Code and Pandoc. This system will include real-time Markdown linting and the ability to generate html, docx, and pdf documents quickly with the potential to produce many other document formats as well.
Markdown is a simple markup language that allows one to write documents using a text editor and transform those documents into many different formats. Among other things, it works beautifully for documenting source code since the Markdown documents can be checked in and versioned with Git or your source control system of choice.
Pandoc is a highly capable “Swiss army knife” tool for converting documents between various formats. It is not limited to Markdown as an input (source) format, but it is used extensively in this context.
Finally, Visual Studio Code is a solid, lightweight code editor created by Microsoft. It is based on the Electron framework, which facilitates the development of desktop GUI applications using the Node.js framework. I’m a huge fan of VS Code, and have written previous articles about it including the Visual Studio Code Jumpstart for Node.js Developers.
If you are not familiar with the Markdown syntax, check out Adam Pritchard’s Markdown Cheatsheet which includes the standard Markdown syntax as well as the extended GFM (GitHub Flavored Markdown) that we will be utilizing in our editor. Markdown is an easy syntax to learn and—as a bonus—you won’t have to wrestle with angle brackets, opening and closing tags, etc.
Let’s get started!
Install Visual Studio Code
Go to the VS Code Downloads page to download and install the appropriate bits for your platform (i.e. Windows, Linux, or OS X). If you already have VS Code installed, be sure you update your copy to the latest version by going to Help | Check For Updates… from the VS Code menu.
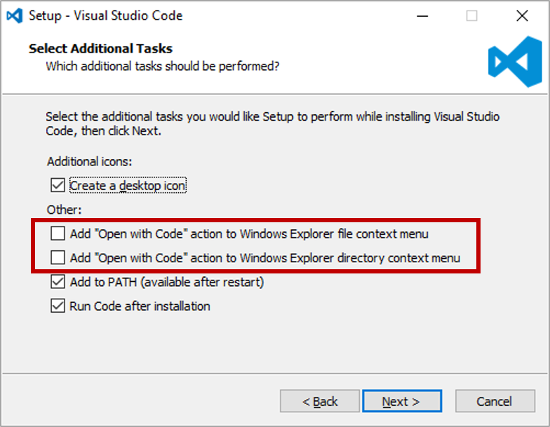
If you are installing VS Code for Windows, be sure to check the two checkboxes shown in the screenshot below. This will give the ability to right click on a folder in Windows Explorer and launch VS Code. These checkboxes are not checked by default.
Familiarize yourself with VS Code out-of-the-box Markdown features
VS Code includes a number of Markdown features that are installed out-of-the-box. Let’s explore these as a first step in your journey to become a Markdown pro.
First, create a folder called md (or name of your choice) that you can use to store your Markdown files. We will also add some additional VS Code configuration files to this folder later.
Next, right click on this folder and choose Open with Code. This will open Code for the entire folder rather than just for an individual file which is very handy for creating and editing many files in a given folder at once.
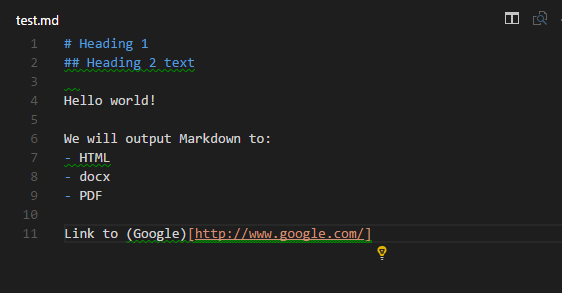
Create a file called test.md and add the following contents:
# Heading 1
## Heading 2 text

Hello world!

We will output Markdown to:
- HTML
- docx
- PDF
Try Markdown previewer
VS Code ships with a Markdown previewer so let’s try that now.
Click Ctrl+Shift-V and you will see a preview of your Markdown code in HTML format. Pretty cool, eh? Click Ctrl+Shift-V again to return to your Markdown code.
You can also create a separate Window pane to preview your Markdown. To do this:
- Press F1 to bring up the VS Code Command Palette.
- Type “mark” to narrow down the list of commands to “markdown” commands.
- Click “Markdown: Open Preview to the Side as shown here:

As shown to the right of the command, you can also press the key chord Ctrl+K followed by V (Ctrl+K V) as a keyboard shortcut to create the preview pane to the side.
As an extra bonus, you can add text in your Markdown document in the pane on the left and see those changes reflected in the HTML preview pane on the right. Try this out now. Very nice!
Markdown Snippets
In your Markdown document, try pressing Ctrl+Space, and VS Code will provide you with a context sensitive list of Markdown commands that can be used. For example, you can press Ctrl+Space, type “link”, and press Enter to insert a hyperlink. You can add the hyperlink text, press Tab, and enter the URL. The Tab key is your friend with many of these snippets.
While beyond the scope of this tutorial, you can also create your own Markdown snippets by navigating to File | Preferences | User Snippets | Markdown from the VS Code menu. See this article for more information.
Install Markdown linter
Let’s add some additional features to the functionality provided out-of-the-box to create an even better Markdown editor! Our first step is to add a Markdown linter. Linters are used by programmers to check source code for programmatic and stylistic errors. It helps both proactively fix errors before they occur as well as enforce a standard style to help make the source more readable and maintainable.
We’re be using the awesome markdownlint VS Code extension developed by David Anson. Here are the steps:
- Press F1 to open the VS Code Command Palette.
- Type
ext install markdownlintto find the extension - Press Enter or click the cloud icon to install it
- Restart Visual Studio Code if prompted
Test drive Markdown linting
Let’s see Markdown linting in action! Go back to your original Markdown document and modify it so it looks like this:
# Heading 1
## Heading 2 text

Hello world!

We will output Markdown to:
- HTML
- docx
- PDF

Link to (Google)[http://www.google.com/]
I’ve intentionally reversed the Markdown link syntax which may be noticed by my astute Markdown veteran readers out there.
In reviewing the document in Code, you will see a number of Markdown errors flagged by green squiggly lines. As you hover over each error, you will also see a light bulb icon that you can click on to get more information on the Markdown errors detected as shown here:
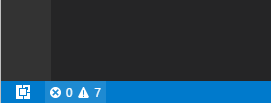
As another avenue for reviewing errors, VS Code provides a count of the number of errors and warnings in the bottom left of the window. In the screenshot below, there are 7 items that need to be addressed.
If you click in the errors and warnings section, a dialog will appear that provides details on the Markdown linting items that need to be addressed:
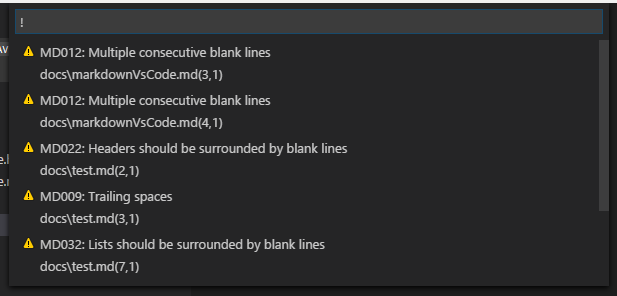
David Anson provides a helpful document highlighting the various Markdown rules enforced by the linter including examples of how to fix the errors. This document can also be accessed from VS Code when reviewing an error that has been detected. You will see a popup menu that appears such as “Click for more information about MD032”, for example.
Let’s go ahead and interact with the linter to fix all of the errors in our Markdown document. There are several minor stylistic errors to fix including the fact that headers should be surrounded by blank lines. Also, as stated above, I intentionally reversed the hyperlink syntax to demonstrate the linter in action. Here’s a revised version of our Markdown document that is cleaner and conforms to the style guidelines imposed by the Markdown linter:
# Heading 1

## Heading 2 text

Hello world!

We will output Markdown to:

- HTML
- docx
- PDF

Link to [http://www.google.com/](Google)
Install Pandoc Extension
Next, we will install the Pandoc VS Code Extension so we can easily transform our Markdown documents into html, docx and pdf formats.
First, we need to install Pandoc following the instructions on the Pandoc installation page.
Next, we’ll install Doug Finke’s vscode-pandoc extension.
- Press F1 to open the VS Code Command Palette.
- Type
ext install vscode-pandocto find the extension - Press Enter or click the cloud icon to install it
- Restart Visual Studio Code if prompted
The VS Code Pandoc extension is now installed. Next, we’ll add some configuration files to tailor our environment before we try out this extension.
Create configuration files to make a great Markdown editor
I’ve done the heavy lifting through quite a bit of trial and error to get the Pandoc extension working in harmony with the Markdown linter and Visual Studio Code. Here’s what directory structure will look like when we are done:
\---md
    |   .markdownlint.json
    |   test.md
    |
    +---.vscode
    |       settings.json
    |
    \---css
            style.css
Let’s make this happen.
Create settings.json file
First, create a .vscode folder (if it does not already exist) in the root directory.
Next, create a settings.json file under this directory. This enables us to customize VS Code for our md (Markdown) folder project without impacting the VS Code settings for other projects.
Note: We could also create the settings.json file under the .vscode folder through the VS Code menu (File | Preferences | Workspace Settings). Either way, we are creating VS Code configuration settings that are specific to our workspace (folder).
Add the following contents to the settings.json file:
{
    "editor.insertSpaces": false,
    "editor.wrappingColumn": 0,
    "editor.quickSuggestions": false,
    "pandoc.htmlOptString": "-s -f gfm -t html5 --css=css/style.css"
}
Feel free to modify this configuration file to suit your coding style. Here’s what these settings accomplish:
- “editor.insertSpaces”: false (This ensures we are using tabs instead of spaces for all new files that are created in our project root. You can press the spacebar four times when creating Markdown lists, but I find it is easier to use the Tab key for Markdown development.)
- “editor.wrappingColumn”: 0 (This activates word wrapping in VS Code so you don’t have to ever scroll horizontally.)
- “editor.quickSuggestions”: false (This disables quick suggestions while you are typing. Otherwise, VS Code will suggest words that already exist in your document as you type. I recommend disabling quick suggestions since I find it annoying while typing. Feel free to experiment to see if you want to enable it.)
- pandoc.htmlOptString (This provides the command line options to use with Pandoc. See the Pandoc documentation for all of the options available. In our case, we include the following options:
- -s (create a standalone HTML document that includes <head>, <body>, etc. rather than just an HTML fragment.)
- -f gfm (convert from GitHub Flavored Markdown syntax which provides all of the standard markdown features plus a few extras as described in Adam Pritchard’s Markdown Cheatsheet.)
- -t html5 (convert to HTML5 format)
- —css=css/style.css (Include links to the css/style.css file in the generated HTML files.
Create Markdown lint configuration file
Let’s create a file called ‘.markdownlint.json’ in the root of our folder. This file enables us to customize the rules used by the markdownlint extension.
{
    "default": true,
    "MD007": false,
    "no-hard-tabs": false,
    "line-length": false
}
Here’s what this file accomplishes:
- default – use the default rules established by markdownlint as a starting point before overriding.
- MD007 – we set this to false to enable lists to be indented under paragraphs without receiving a warning.
- no-hard-tabs – we set this to false to allow tabs since we are using tabs instead of spaces in lists, for example.
- line-length – we set this to false to allow lines to be longer than 80 characters or some other number of your choosing. I have found this makes editing easier and I am not concerned with enforcing this. You may decide you want this rule enforced.
Create CSS file to be used by HTML generated by Pandoc
- Create a css folder in the root directory.
- Create a style.css file in the css directory.
- Modify the style.css with the style of your suiting. I used this style sheet from here as a starting point and changed the background to white and removed the italics.
Create an HTML Document with Pandoc
Now that we have finished those steps, we are ready to create documents! To create an html document with Pandoc within VS Code:
- Click somewhere in the markdown file you are seeking to convert.
- Press
Ctrl+kand thenp. (You will be prompted with an option to choose html, docx, or pdf.) - Select html to render an html document. (The resulting HTML document will launch in your default browser.)
Additional Bonus Extensions
Here are some additional bonus extensions I have found useful for Markdown editing in VS Code:
- Code Spell Checker – helps to catch common spelling mistakes with squiggly lines under words just like Microsoft Word. You can right click and add words to a custom dictionary too.
- Markdown helper – this extension is worth the price of admission alone for its ability to format and manipulate markdown tables. Can right click on the table to access various commands.
- :emojisense: – Intellisense for emoji! Quickly insert emoji using the “:smile:” syntax supported by Github and many other sites. Need I say more? 🤠
Conclusion
You have now created an awesome Markdown editor/environment that you can use for all of your documentation needs! Pandoc provides a number of other conversion options that you can either add in the VS Code configuration or run from the command line to produce other document formats, create books, etc. You now have an amazing Markdown editor. Go have fun with it!
Follow Dave Johnson @thisDaveJ on Twitter to stay up to date on the latest tutorials and tech articles.
Related Articles
Visual Studio Code Jumpstart for Node.js Developers
Using Visual Studio Code with a Raspberry Pi (Raspbian)
Right click on Windows folder and open with Visual Studio Code

I’m a newbie. I would really like to create this editor I’m having trouble figuring out how to insert the code snippets into the folders? When I try to cut and paste the snippets nothing happens. When I try to type snippets nothing happens. Do I cut and paste then into a text document and save the document into the file? Any help would be appreciated.
Thanks
John
yes for sure. vscode has a lateral bar on the left where it shows the working directory and the opened file. Any snippet listed here reside in a specific file you have to create either in your os file managere (i.e. windows file explorer, macos finder and so on) or directly in vscode by right click on the dir\subdir you need the file will be created. next you can open the file in vscode, copypaste the snippet and save it. The files described in this post are: \—md
| .markdownlint.json
| test.md
|
+—.vscode
| settings.json
|
\—css
style.css
I use Visual to create folders with code snippets. This seems to have worked. I got the editor to work and created an HTML file. This cool.
John
This post was very helpful, thanks a lot!
Excellent – glad it was helpful to you. I appreciate the feedback!
Awesome tutorial and gentle introduction! Thank you very much!
why not also installing the pandoc formater extension?
May be an – untested- suggestion: https://superuser.com/questions/148884/is-there-a-way-to-export-word-styles-as-css if you have legacy word templates wich styles you need to use in your final doc, this will be helpful to build your styles.css file.
Pretty cool dude!, I love the html preview function. Thanks!
thanks for the note, it is very helpful, but certain pandoc command:
—
title:
author:
—
cannot be shown in the preview of vscode, do you have any way to deal with that?
thanks
Elrond
Hi Elrond, I think the behavior of VS Code not showing the title and author text (as described in your example) in the preview is by design. What you are describing is called a YAML metadata block and typically appears at the top of a Markdown document. Since it is metadata, it is not intended to be shown in the preview, but to be used in the rendering of the markdown document into a different format. To enable the title/author metadata you described to be rendered/displayed with the resulting HTML, you can modify the `pandoc.htmlOptString` contained in the `settings.json` file (already included as a step in my tutorial) to the following value:
“pandoc.htmlOptString”: “-s -f markdown_github+yaml_metadata_block -t html5 –css=css/style.css”
The only change is the addition of “+yaml_metadata_block” to activate the YAML metadata block Pandoc extension.
This is a great write up. The only thing I can’t get straight is the CSS. I’m not sure where to keep the css folder. Does it go in root workspace folder? If so, that doesn’t seem to add style to my documents.
Dennis, a folder called “css” should reside in the folder containing the Markdown (.md) file you want to convert to HTML. See the directory tree diagram in the “Create configuration files to make a great Markdown editor” section of the tutorial. Furthermore, the CSS file should be called “style.css” unless you change the “pandoc.htmlOptString” parameter as described in the “Create settings.json file” section. When you convert a .md file to .html, the .html file will get generated right next to the .md file in the directory and leverage the css folder that you also created in the same directory.
Very helpfull Dave, many thanks!
That I cannot do is to export the file with Pandoc. I have installed it and the vscode plugin.
Could you help me?
Thanks!
Hi León, if it’s not working, I recommend that you open the terminal and navigate to the directory containing the .md file you want to convert. Assuming the Markdown file is called
test.md, run the following command to see if Pandoc works by itself and produces atest.htmlfile:pandoc -s -f gfm -t html5 --css=css/style.css test.md -o test.html(You will essentially be running Pandoc using the same options added using the
pandoc.htmlOptStringproperty in thesettings.jsonfile earlier in the tutorial.)This may help narrow down if the problem is with Pandoc, the VS Code extension, or something else.
Hi Dave,
I found this article after opening VSCode and attempting to seriously use it for the first time. One of my very favorite applications is Pandoc, so I was excited to see if I could do this. I did. And thanks to the newest Insiders release, VSCode works well with the NVDA screen reader. I’m going to see if I can hook it up with the new site I am making in Hugo using Netlify and Github. Lots of fun ahead.
Jim, I’m glad my article was helpful to you. That’s awesome that the NVDA screen reader works with the newest Insiders release of VS Code. Have fun writing code!
How would you include metadata in the document, such as for the title of a generated HTML file. I can’t find anything in the pandoc user manual about this. It assumes that you either include a HTML title tag or specify the title as a command-line option. The VS Code extension does not recognize a tag or so-called title block.
A follow-up to my question above: I resolved this by using the YAML metadata syntax at the very beginning of the file, instead of the # Heading line, like this:
—
title: My Nice Title
—
So it appears as both the in-page title and the title on the browser tab.
That YAML block start and end, as in the preceding comment, is three dashes and not a continuous straight line as rendered above.
This looks promising.
But what about the poor, handicapped, Widows user?
How do they do all these clever things to get something that works for them?
Hello,
the link in md code below “Here’s a revised version of our Markdown document that is cleaner and conforms to the style guidelines imposed by the Markdown linter:” seems to be wrong. I would have written [google](correct_url)