I’m preparing for an upcoming speaking engagement around the topic of using Node.js and the Raspberry Pi for IoT applications. While at home, I enjoy the luxury of being the owner of my network which provides complete freedom in network configuration. On the road, I will not have this luxury whether it is at a hotel or when speaking at the conference.
 Here’s the problem I am trying to solve. While on the road, I want to be able to connect my laptop to the Wi-Fi hotspot on my phone rather than utilizing the wireless network at the conference location which might be fraught with both security and reliability issues. I also want to be able to get my Raspberry Pi system on the Internet. Additionally, I need my Raspberry Pi and my laptop to reside on the same network so I can easily connect and share files back and forth. Finally, I need this to be easy and foolproof so I’m not sweating on stage and trying to tweak Raspbian network configuration settings in order to establish network connectivity.
How about you? You might also have a similar need if you are seeking to get your Raspberry Pi on the Internet at a hotel, university, or other venue such as a conference. I’m going to show you how you can get your Raspberry Pi on the network when you are not connected to your home network using an Ethernet crossover cable.
I have read a lot of guides on the Internet, but they involve way too many steps. Surely there must be a better way that requires minimal fuss? Absolutely! Let’s get started!
Introduction
This guide assumes you are seeking to get your Raspberry Pi connected on the Internet through a Windows machine when you are away from your home network.
Equipment needed
- Ethernet (RJ-45) cable: We will be establishing a direct connection between the Ethernet port on our RasPi and the Ethernet port on our Windows machine. Back in the days of yore, this required a special Ethernet “crossover cable” to crossover the transmit and receive signals in the cable in order to achieve a working connection. In today’s world, you should be able to use a standard Ethernet cable rather than a special crossover cable since most modern machines support automatic crossover detection—a feature called Auto MDI-X. The RasPi also supports Auto MDI-X so we should be good to go! If you don’t already have an Ethernet cable, you can get one from Amazon. Note: these are my Amazon affiliate links.
- Ethernet port on Windows machine: If your Windows machine does not already have an Ethernet port, you can buy a USB to RJ45 Ethernet Network Adapter such as this one on Amazon.
Prepare the Raspberry Pi
Install Samba
The main secret behind this super easy method of connecting your RasPi to the Internet through a crossover cable involves a program called Samba.
Samba is an implementation of the SMB networking protocol and it allows Linux machines (including the RasPi) to inter-operate with Windows machines and look like another Windows machine on the network. Most people think of installing Samba when they want to create Windows file shares on the RasPi. By virtue of installing Samba—even if you are not planning to do file sharing with Windows machines—you get the benefit of having your RasPi broadcast its hostname and become discoverable to the Windows machines on your network.
You will thus not need to remember or try to guess the IP address of your RasPi when it is connected in our special crossover configuration. Let that sink in for a minute. This is a huge benefit if you’ve ever tried to get along without it!
If you followed the steps in my Beginner’s Guide to Installing Node.js on a Raspberry Pi, you will not need to complete this step. I’m including the instructions for installing Samba again here for your convenience:
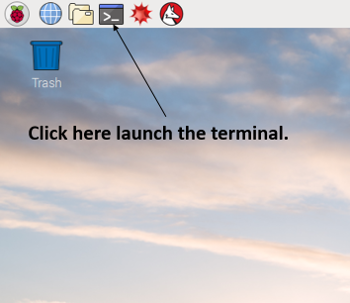
First, launch the terminal as shown in the following Raspbian screenshot:
From the terminal $ prompt, enter the following command:
$ sudo apt install -y samba
The “-y” option will automatically answer yes to the default questions which is what we want in this context.
After the installation is complete, get the name of your RasPi host name by typing the following command from the terminal:
$ hostname
The default host name is raspberrypi, but this can be changed using the graphical Raspberry Pi Configuration as described in my Beginner’s Guide.
Next, jump over to your Windows machine and enter the following command from the prompt. (Subsitute raspberrypi with the host name of your RasPi obtained above.)
C:/> ping raspberrypi
Yes! Your Windows machine should respond back with successful ping replies. No more remembering RasPi IP addresses or hardcoding it in the Windows hosts file only to find that the IP address of your RasPi has changed. This automatic RasPi host name availability will prove invaluable as we complete the rest of the steps in this guide to get on the network through a crossover cable.
(Optional) Disable Wi-Fi on your RasPi
This step of disabling your Wi-Fi is completely optional, but it can be used to build your confidence that this crossover connection procedure will work when you are away from your network. If your Wi-Fi is enabled, your crossover connection will still work successfully at home; however, your RasPi may handle some network traffic through its Wi-Fi connection and some through the crossover cable connected to your Windows machine.
Raspberry Pi 3
If you own a Raspberry Pi 3, your system includes built-in Wi-Fi. To temporarily disable Wi-Fi, keep in mind the following:
If you operate your RasPi headless over Wi-Fi, you will need to carry out these steps first so you don’t “cut off the branch you are standing on” since you will otherwise be disabling Wi-Fi while you are connected remotely to the RasPi through XRDP/VNC. (As an alternative to these next steps, you can also connect your RasPi using an external monitor and keyboard/mouse.)
- Shut down your RasPi cleanly using a method such as
sudo shutdown -h now. - Connect an Ethernet cable from your RasPi to your router.
- Power on your RasPi.
Here are the remaining steps for all RasPi 3 owners whether now connected by Ethernet or connected directly to a monitor/keyboard/mouse:
- Temporarily change your WiFI (SSID) password in order to effectively disable Wi-Fi. This is accomplished by editing a configuration file as follows:
$ sudo leafpad /etc/wpa_supplicant/wpa_supplicant.conf
You will see any entry for your SSID that looks something this:
network={ ssid="WifiNetwork" psk="Your_wifi_password" } - Add a couple of extra characters to the end of the psk (Pre-Shared key) which is your Wi-Fi password.
- Save the changes you made to the configuration file.
- Shut down your RasPi through the terminal or by through the graphical interface.
$ sudo poweroff
- Unplug the power from your RasPi.
Raspberry Pi 2
If you are connected through Wi-Fi on a RasPi 2, you using some type of Wi-Fi USB adapter such as this Edimax USB WiFi adapter. The steps to disable Wi-Fi are even easier. 🙂 Here we go:
- Shut down your RasPi through the terminal or by through the graphical interface.
$ sudo poweroff
- Unplug the power from your RasPi.
- Remove the Wi-Fi USB adapter.
Prepare the Windows Machine
Now that your Raspberry Pi is prepped and powered off (this is important), we are ready to configure our Windows machine to finish things up.
Windows Internet Connection Sharing (ICS) Configuration
- Launch the Windows Network Connections configuration by pressing
Win+R(the Windows key on your keyboard followed by “R”) and selectingNetwork Connections. You will see a dialog box similar to the following containing your Wi-Fi connection and your Ethernet (RJ-45 cable) connection:

- Right click on your Wi-Fi connection icon, select
Propertiesand then click theSharingtab. You will see a dialog box similar to the following:
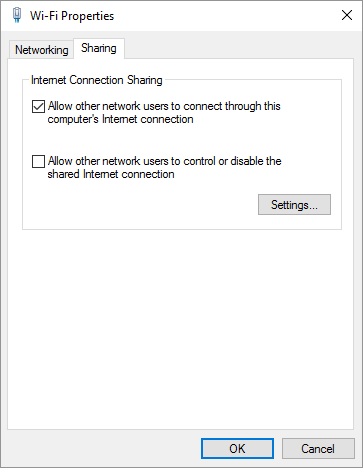
- As shown the screenshot above, select “Allow other network connections to connect through this computer’s Internet connection”. Also, clear “Allow other network users to control or disable the shared Internet connection” if it is selected.
Prepare Windows Network Connection
If your Windows machine is not already connected over your Wi-Fi network, connect it now. If you are away from home, this might involve connecting your Windows Wi-Fi connection through a Wi-Fi hotspot on your phone or through a local Wi-Fi connection. Keep in mind that you want to connect through your Wi-Fi connection rather than your Ethernet cable since you will need your Ethernet port to connect the RasPi through the crossover cable.
Connect Raspberry Pi to Windows
We’re almost there! Your RasPi is powered off at this point, right? Again, this step is important for all of this to work.
Connect an Ethernet cable into your Raspberry Pi and connect the other end of the cable into your Windows machine. Make sure the Ethernet cables are seated well in each machine.
We are now ready for the final step! Go ahead and power on the RasPi. This will enable the RasPi to detect the new network configuration and adapt accordingly. Wait for about a minute for the RasPi to boot.
Next, confirm that you can see the RasPi from the Windows machine. From the Windows command prompt, enter the following command. Again, subsitute raspberrypi with the host name of your RasPi.
C:/> ping raspberrypi
Finally, remote into the RasPi through XRDP, VNC, Putty, or other method of choice. This is the moment of truth where you confirm that your RasPi has Internet connectivity. From the RasPi terminal, enter the following command:
$ ping google.com
You should see ping responses back if all went well. Press Ctrl+C to halt the ping command since it will keep pinging forever otherwise.
Steps Needed Each Time
Now that you have completed these steps, it is very easy to re-establish the Raspberry Pi Ethernet crossover connection each time you need it. Here are the key steps:
- Shut down the RasPi. (
sudo poweroff) - Ensure the Wi-Fi connection is up and running on your Windows machine through a Wi-Fi hotspot on your cell phone or some other means.
- Connect an Ethernet cable between the RasPi and your Windows machine
- Power on the RasPi.
- Wait about a minute and remote into the Pi through XRDP, VNC, Putty, or other method using the RasPi host name.
Extra steps that may be needed
If you have patiently waited a minute and you are still not able ping or connect to your Raspi host, try the following:
- On your Windows machine, launch the Windows Network Connections configuration by pressing Win+R (the Windows key on your keyboard followed by “R”) and selecting Network Connections.
- Right click on your Wi-Fi connection icon, select
Propertiesand then click theSharingtab. You will see a dialog box similar to the following:
- Uncheck the “Allow other network connections to connect through this computer’s Internet connection” and click OK.
- Repeat these steps and re-check the “Allow other network connections to connect through this computer’s Internet connection” checkbox and click OK.
- Power off the RasPi.
- Power on the RasPi.
- Wait about a minute and remote into the Pi through XRDP, VNC, Putty, or other method using the RasPi host name.
You should now be connected to the Internet from both your Windows machine and your RasPi machine. Furthermore, you can also communicate directly between the two machines to share files through Samba, and share other resources.
Conclusion
I can’t believe how easy it is to create a RasPi crossover connection through a Windows machine! I expected to be sitting down for half a day of deep network configuration with static IP addresses, etc. Hopefully this guide I have provided here will save you some time as well!
Follow @thisDaveJ (Dave Johnson) on Twitter to stay up to date on the latest tutorials and tech articles.
Additional Articles
Beginner’s Guide to Installing Node.js on a Raspberry Pi
Upgrading to more recent versions of Node.js on the Raspberry Pi
While I napped, we got a new apt – Debian apt command cheat sheet
Using Visual Studio Code with a Raspberry Pi (Raspbian)

The Best Guide ever
Shayan, thanks for taking the time to provide feedback. Glad to know it was useful to you!
Unfortunately I found a problem the day after when I wanted to connect again to raspberrypi.
I did all of the steps that you have provided here. In the last step while I connected my Rpi via cross cable to laptop, I turned off WIFI of my Rpi to make sure that the connection is through cable. it was still working. I shut down Rpi, but when I wanted to re-connect it, PUTTY didn’t accept me the “host name” (in my case the default name raspberrypi). i have tried different ways also I found the IP of my Ethernet and it didn’t work. Also the IP of Rpi is lost (I suppose) because the IP founder Zenmap couldn’t find it.
Could you help me please
Thanks for letting me know about this issue. I was able to reproduce the issue after applying the latest Raspbian updates with the PIXEL desktop. I updated this guide to provide a different way to disable Wi-Fi on the RPi 3. Please follow the new instructions which involves temporarily changing your wi-fi password via the wpa_supplicant.conf file. I also an “Extra step that may be needed” section near the end. In this section, I describe how to bounce (disable and re-enable) Internet Connection sharing (ICS). I had to bounce ICS and power off the Pi and then power it back on to get the crossover connection working. You should not need to bounce ICS each and every time, but it may be needed in some contexts.
Looking for powerful advertising that isn’t full of crap? I apologize for sending you this message on your contact form but actually that was kinda the point. We can send your ad text to sites via their contact pages just like you’re receiving this ad right now. You can target by keyword or just execute bulk blasts to sites in any country you choose. So let’s say you’re looking to push through an ad to all the interior decorators in the USA, we’ll grab websites for just those and post your ad text to them. As long as you’re advertising something that’s relevant to that business category then your business will get an amazing response!
Shoot an email to [email protected] for details on how this works