![]() Welcome back! In a previous tutorial (Beginners Guide to Installing Node.js on a Raspberry Pi), we installed Node.js on a Raspberry Pi. We are now ready to continue our LTM (Learning through Making) tutorial series and build a simple web server without any code. While this tutorial is geared toward the RasPi, the instructions can be easily mapped over to other platforms such as Windows, Linux, and OS X. Let’s get started!
Welcome back! In a previous tutorial (Beginners Guide to Installing Node.js on a Raspberry Pi), we installed Node.js on a Raspberry Pi. We are now ready to continue our LTM (Learning through Making) tutorial series and build a simple web server without any code. While this tutorial is geared toward the RasPi, the instructions can be easily mapped over to other platforms such as Windows, Linux, and OS X. Let’s get started!
After powering on the headless Node.js RasPi that you built in the previous tutorial, log in from a Windows system by launching a Windows Remote Desktop Connection. (Hit the Windows key on your keyboard and type Remote Desktop Connection to get started.) This method of remote connection works since we installed xrdp as part of the last tutorial. Of course, you can connect the RasPi directly to a monitor/keyboard/mouse or use other remote options such as an X Server.
Next, launch a terminal window so we can install a special Node package to get this web server up and running in no time. We installed Node in our previous tutorial and we consequently have another command available to us called npm (Node Package Manager) which interacts with the official Node npm package repository containing hundreds of thousands of Node packages.
At the shell prompt, type the following:
$ sudo npm install -g http-server
This will install the npm package called http-server globally so it is available as a command anywhere on the RasPi rather than just in the current directory. The http-server package was created by the amazing IndexZero (aka Charlie Robbins) who as authored a number of npm packages. Here’s a screenshot that describes this package aptly:
We’re preparing to serve up static files like they were turtles strapped to rockets!
When we opened the terminal window, it dropped us into our home directory on the RasPi. We’re now going to change the directory to the Public directory since this will be a convenient place to store and serve up our web files.
$ cd Public
Let’s go ahead and create a simple HTML file to serve. We’ll launch Leafpad, a user friendly RasPi text editor, to get the job done:
$ leafpad index.html &
We put the “&” at the end of the command so that Leafpad will be launched as a separate task and return us to the shell prompt. Also, we could have used other text editors such as nano, but Leafpad provides a simple, graphical interface which is very intuitive.
Enter the following HTML code in the Leafpad window (or enter your own HTML):
<html>

<head>
  <title>Welcome</title>
</head>

<body>
  Welcome to my website!
</body>

</html>
Save your file and close out Leafpad.
Can you feel the excitement? 🙂 We’re going to be launching a web server soon and serving up this file on our network.
Back at the terminal, let’s issue a ls (list directory contents) command to verify that the index.html file we just created is there (your shell prompt will include the word “Public” in it rather than just “$” as shown in the example below):
$ ls
index.html
$
Very good – the index.html file is present in the directory. Let’s start serving up this file with our web server by issuing the following command:
$ http-server
Upon launching, you will see something like this:
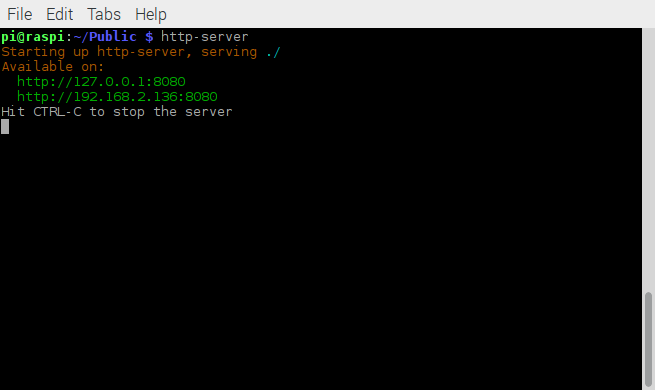
How cool is that? One simple command and we are up and running with a web server.
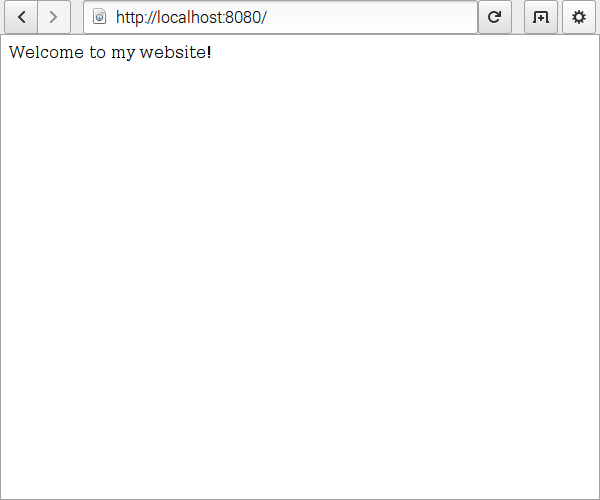
Let’s try it out from a browser. Go ahead and launch the web browser included with Raspbian and type in the following URL in the address bar:
http://localhost:8080
It works! This Node http-server package is pure genius. Super simple to use.
We should now be able to go to another machine on our network and invoke the web server on the RasPi. If you are using the default Raspberry Pi hostname (and did not change it through raspi-config), your server name will be “raspberrypi”. Enter the following in your browser address bar:
http://raspberrypi:8080
If this does not work, you may need to install Samba as described in my article here or use the IP address of the RasPi to view the web server files from another machine on your network.
You can also serve up the entire directory of files. Let’s see this in action.
First create another file called hello.txt in the Public directory:
$ leafpad hello.txt &
Enter something simple in this file such as “hello world”, save it, and close Leafpad.
Next, rename the index.html file so that the web server will no longer find a default document to serve and will serve a listing of the entire directory instead:
$ mv index.html index2.html
Ok, go ahead and launch the Web browser again. You will see something like this:

We’re serving up the whole directory! This is typically a security faux pas in the real world, but it can be a great way to serve up an entire directory of files (potentially including subdirectories, etc.) to other machines on your home network.
The http-server package contains several other options as described here. As one last example, we can serve up port 80 instead of the default port 8080.
First, use Ctrl-C in the terminal to stop the web server.
Next, we need to issue this command with elevated privileges using sudo so that we are able to “bind” the web server to port 80.
$ sudo http-server -p 80
We can now visit our web server by going to http://raspberrypi rather than http://raspberrypi:8080
We have a bona fide web server running here serving URLs that look legit too.
How might this simple Node web server be useful? Here are some examples:
- Serving up files for sharing with other machines on your network.
- Teaching yourself or others you love about HTML with a real web server to stage and serve up the files
- Providing a web portal for IoT projects you are hosting on your RasPi.
That’s it for now. There will be more fun tutorials on the way!
Follow Dave Johnson on Twitter to stay up to date on the latest tutorials and tech articles.
Additional articles
How to Host a Raspberry Pi Web Server on the Internet with ngrok
Guide to Using Redis with Node.js
How to Set up a Firewall for Redis using ufw
Guide to Installing Node.js on a Raspberry Pi
How to Count Unique Items in JavaScript Arrays

I tried to set the port and crashed it.. Any help?
>http-server app -p3000
events.js:141
throw er; // Unhandled ‘error’ event
^
Error: listen EADDRINUSE 0.0.0.0:3000
at Object.exports._errnoException (util.js:873:11)
at exports._exceptionWithHostPort (util.js:896:20)
at Server._listen2 (net.js:1250:14)
at listen (net.js:1286:10)
at net.js:1395:9
at nextTickCallbackWith3Args (node.js:453:9)
at process._tickCallback (node.js:359:17)
at Function.Module.runMain (module.js:443:11)
at startup (node.js:139:18)
at node.js:968:3
Based on the error message you are receiving (“EADDRINUSE”), I’d venture to guess that you are already running something else such as another web server on port 3000. Try a different port and I think it will work for you.
You were right. Thanks!
Great tutorial! How do you set up the pi so that you can enter in a domain name instead of localhost or ipaddrss of the pi? For instance enter in http://www.myhomepage.com:8080 instead of localhost:8080
My Beginner’s Guide to Installing Node.js on a Raspberry Pi describes how you can install Samba so that you can ping/resolve the host name of the Pi from a Windows/Mac/Linux machine on your local area network rather than using the IP address. You can also use a tool such as ngrok to expose your Raspberry Pi behind your NAT/firewall to the Internet. For security reasons, I don’t recommend this approach as a long term solution, but more as an interesting academic exercise only.
thank you for this great job
i have an issue after running this command : sudo http-server -p 80
error :sudo http-server -p 80
events.js:182
throw er; // Unhandled ‘error’ event
^
Error: listen EADDRINUSE 0.0.0.0:80
at Object.exports._errnoException (util.js:1022:11)
at exports._exceptionWithHostPort (util.js:1045:20)
at Server.setupListenHandle [as _listen2] (net.js:1315:14)
at listenInCluster (net.js:1363:12)
at doListen (net.js:1489:7)
at _combinedTickCallback (internal/process/next_tick.js:105:11)
at process._tickCallback (internal/process/next_tick.js:161:9)
at Function.Module.runMain (module.js:607:11)
at startup (bootstrap_node.js:158:16)
at bootstrap_node.js:575:3
Me Tooo!!!
Hi, thanks for this great tutorial.
I followed your guidelines, everything seems ok except the leafpad, I always get themessage “Cannot open display: ”
For example after typing :
pi@raspi:~/Public $ leafpad index.html &
[1] 2547
pi@raspi:~/Public $ leafpad: Cannot open display:
I am very new to PI3 and Linux, so maybe I do something wrong..?
Please advice, thanks!
Wim
Hi Wim, did you remote into the Raspberry Pi using an ssh client or are you running the full Raspberry Pi desktop (X Window) environment? The error you are receiving makes it sound like you are logged in with an ssh client and (without further configuration) you cannot run GUI programs. In my Beginner’s Guide to Installing Node.js on a Raspberry Pi, I describe how to build a Raspberry Pi system that you can connect to with Remote Desktop (Windows). Or…if you are running on a Mac, you can install tightvnc on the Pi and remotely connect to a full graphical environment. The “cannot open display” errors should go away.
Here’s another nuance that probably doesn’t apply to you, but may help someone else: if you are wishing to run leafpad as the root user, you need to run “gksudo leafpad myfile.txt” on the current version of Raspbian rather than “sudo leafpad myfile.txt”. In your current context where you are following my tutorial, you should be able to invoke “leafpad” without using gksudo/sudo, and it should work.
Thank you for this excellent tutorial.
I managed to install and use everything including node.js and http-server on a Raspberry PI-3 but ran into a problem due to my limited node.js knowledge.
My website is a datatable based on an index.html file and some Jquery and Javascript files including data.js — a Javascript array variable with the table contents. After starting http-server and going straight to the browser (-o parameter) the table is displayed without any problems; so far so good.
After making changes to the table I want to save (overwite) data.js and also get its lastwrite date. To do so, I rebuild data.js from the table contents, but I don’t know how to get the server to write it. A simple saveData.js file says “require is not defined”.
var fs = require(‘fs’);
fs.writeFile(‘data.js’, data, function (err) {
if (err)
return console.log(err);
});
Hope you can point me in the right direction.
Hans, if you can email me (thisdavej [at] gmail.com) a zip file of your half finished project, I’ll take a look. It will help to have a fuller context so I can advise you on the best way to accomplish your goal.
You are amazing! So responsive and helpful…
The ZIP file with some explanatory notes should be in your mailbox.
Hi Dave!
This tutorial is really helpful, especially that I am new to Raspberry Pi.
I encountered some problems though… I was able to keep launch the server. However, when I tried it on the browser, localhost refused to connect. What could have been the problem?
By the way, I can ping localhost and my raspi node in the terminal..
Hi Dave,
Thanks for your excellent tutorial, I managed to set up my own Node.JS web server at home, in my pi3. Thanks a lot buddy, I’ll be checking your webpage every now and then for more Node.JS and PI stuff. Cheers!
Thanks, Rodrigo! Glad you were able to successfully set up your own Node.js web server at home running on your pi3. Yes, I’m hoping to have time to write some more tutorials before too long. You can check out my home page (https://thisdavej.com/) to see other tutorials I already have out there.
Hello Dave, I wanted to say THANK YOU for the great tutorials here. It is very easy to understand everything. I am pumped to watch out for more interesting stuff. I am following you on Twitter!
Timo, thanks for your words of encouragement! It’s people like you who keep me motivated and writing tutorials. I have more tutorials planned and on the way. 🙂
Great blog right here! Additionally your site
rather a lot up fast! What web host are you using?
Can I am getting your affiliate link on your host?
I wish my website loaded up as fast as yours lol