
In our last article, we learned how to control a Raspberry Pi from a mobile device and, as a bonus, we created a menu to make it even easier to issue commands and control our Pi. We’re back today to put that remote menu to good use because we’re building an amazing Pandora music player we can connect to a stereo in our living room, for example, without a monitor, keyboard, or mouse. Our system will include a web interface served through Node.js so we can control our Pandora player remotely from a mobile phone—all from the comfort of our couch. 🙂 Follow along with me and let’s make this happen!
Note: I originally released this article two years ago and have updated it based on the latest version of Raspbian.
Article Contents
Complete Prerequisites
Prepare your Raspberry Pi
If you have not already followed my Beginner’s Guide to Installing Node.js on a Raspberry Pi, I recommend that you take a look at that now. In this guide, I equip you with the knowledge needed to build an awesome Raspberry Pi system that can also run in a headless mode. We’re able to avoid a dedicated monitor, keyboard, and mouse, and this is exactly what we need to maximize the awesomeness of our Pandora player.
At the very least, make sure you follow the steps to install Node.js because Node.js will be powering the built-in Pandora web server we’ll be accessing from our mobile devices.
Create Pandora account
If you do not already have a Pandora account, go ahead and visit Pandora.com and create one now. Pandora is “free personalized radio that plays the music you love”. What’s not to love about that? 🙂
While you are logged into Pandora, go ahead and create a couple of stations. Our remote web interface will ultimately need stations in order to to play music for us.
Install additional packages
We’ll need a couple of additional packages to utilize our Pandora player. First, let’s install pianobar, an amazing console-based pandora.com player underpinning our entire project:
$ sudo apt install pianobar
Next, we’ll install screen, a terminal-based window manager that our software will use behind the scenes in conjunction with pianobar:
$ sudo apt install screen
Install Patiobar
As a next step, we’ll install and configure Patiobar, a web frontend for pianobar created by Kyle Johnson. I was gearing up to create a web interface to pianobar and came across Kyle’s project. He has done an excellent job, and we’ll be leveraging his work to create this fantastic music system.
Go ahead and ensure your terminal session is in your home directory:
$ cd ~
Also, these very next steps require Node.js so make sure you have that installed.
Ok, let’s install Patiobar. Execute this next set of commands one by one from the terminal:
$ git clone https://github.com/kylejohnson/Patiobar.git
$ cd Patiobar
$ bash install.sh
Excellent! We just made some serious progress and installed the foundational elements needed for our Patiobar web server.
Configure pianobar so it’s ready to be used by Patiobar
Our Patiobar web frontend ultimately uses pianobar behind the scenes to serve up music from Pandora so we need to make sure pianobar is configured and in working order first.
Launch the pianobar configuration file for editing using the Leafpad text editor:
$ leafpad ~/.config/pianobar/config &
The contents will look something like this:
user = [email protected]
user = [email protected]
password = password
#autostart_station = 123456
audio_quality = high
event_command = /home/pi/Patiobar/eventcmd.sh
fifo = /home/pi/Patiobar/ctl
tls_fingerprint = FC2E6AF49FC63AEDAD1078DC22D1185B809E7534
Substitute the user parameter with your Pandora user account email, and substitute the password with your Pandora password, and save your changes.
Great work! We’re making excellent progress and we’re ready to launch pianobar by itself to confirm it works. Connect a set of earbuds or speakers to the audio output jack of your Raspberry Pi. Get ready to hear some music!
Issue the following command to launch pianobar:
$ pianobar
At this point, pianobar should log into Pandora and prompt you to select a station for listening. Now, select the default station that you would like to start each time the Raspberry Pi music player starts. You will be able to change this station from the web interface that is provided, but we need a starting station to bootstrap our player each time it starts. The pianobar station selection dialog will look something like this:
[?] Select station: 2
|> Station "David Nevue (Holiday) Radio" (3749270268933429865)
After selecting a station, hit Ctrl+C to quit. If Ctrl+C does not work, try Ctrl+\ instead.
You will need the long station number listed in parentheses, 3749270268933429865, as shown in our example above, for the next step.
Edit the pianobar configuration file one more time:
$ leafpad ~/.config/pianobar/config &
Replace the existing autostart_station line with the long station number you obtained above. Be sure to remove the “#” from the beginning of the line so pianobar can read the autostart_station configuration information.
autostart_station = 3749270268933429865
Save your changes and launch pianobar again.
$ pianobar
This time, pianobar should jump right in and begin playing your default station without intervention required by you. Assuming this is the case, you are ready to finish the installation so we can use pianobar with the awesome Patiobar web frontend powered by Node.js.
Create Patiobar start and stop scripts
Okay, let’s create a couple of scripts to make it easy to start and stop Patiobar.
Create bin directory to make our menu command accessible from any directory
First, we will create a directory so our scripts will be accessible from any directory on our system without the need to provide a full path name to our script.
From the terminal, return to your home directory if you are not already there.
$ cd ~
Next, create a directory called bin:
$ mkdir bin
We will need to edit our .bashrc file to include this bin directory in our PATH variable. This will ensure that any scripts located in our newly created bin directory can be invoked from any directory on our system without needing to include the full path to the script. Let’s first launch a text editor so we can edit the .bashrc file:
$ leafpad .bashrc &
Add the following line to the bottom of this file:
export PATH="$HOME/bin:$PATH"
Save your changes and close the leafpad editor.
To ensure our changes to the .bashrc file are processed right away, invoke this command:
$ source .bashrc
Perfect! We are now positioned to create our Patiobar start and stop scripts.
Create pbstart (Patiobar start) command
We’ll use leafpad once again to create our new command. We’ll call our command pbstart (Patiobar start):
$ leafpad ~/bin/pbstart &
Add the following contents and save the file.
#!/bin/bash

cd /home/pi/Patiobar

# Kill any old Patiobar processes running
pbstop 1> /dev/null

screen -S pianobar -d -m bash -c 'pianobar'

# The "patiobar" in the end is not needed and is used as an identifier so we can kill it when stopping.
# Otherwise, we might kill other "node index.js" processes.
node index.js patiobar > /dev/null 2>&1 &

echo "Go to http://$(hostname):3000/ to launch the Web interface."
Create pbstop (Patiobar stop) command
Using leafpad once again, create a second command called pbstop (Patiobar stop):
$ leafpad ~/bin/pbstop &
Add the following contents and save the file.
#!/bin/bash

echo Closing out Pandora processes...
pkill -xf "SCREEN -S pianobar -d -m bash -c pianobar"
pkill -xf "node index.js patiobar"
echo done
Set user execute bit on the pbstart/stop scripts
Finally, set the user execute bit on both files so the pi user has permission to run the scripts:
$ chmod u+x ~/bin/pbstart
$ chmod u+x ~/bin/pbstop
Launch Patiobar and start listening to music!
Okay, here’s the moment of truth. Let’s try out our pbstart command and see if we can start up Patiobar. Remember that we can invoke this command from any directory on our system since it is part of our PATH. Here we go!
$ pbstart
Patiobar should start up pianobar, and you should both hear music and be able to navigate to the Patiobar web interface running on port 3000. For example, my Raspberry Pi host name is called “pandora” so I would navigate to http://pandora:3000. It’s December and I’m listening to Christmas music so this is what I see when launching the web interface from my mobile phone:

The interface is excellent and we can change stations using the “hamburger” menu in the top right, and pause, skip songs, etc. There’s even album art as you can see!
When you are done listening, stop the Patiobar player so you do not consume all your Pandora minutes:
$ pbstop
Install SSH client on mobile phone to control Pianobar start/stop remotely (optional)
We learned how to control a Raspberry Pi from a mobile device] in our last article and I encourage you to read that article to learn how to install an SSH client on your mobile device so you can invoke terminal commands from your phone. It’s pretty amazing and useful to not be tethered to a laptop or desktop and still log in and interact with your Pi!
After the mobile SSH client is installed you will be able to invoke pbstart from your mobile device to start Patiobar, stop Pianobar with pbstop, and safety shut down your Pi using the following command:
$ sudo poweroff
Utilizing a mobile SSH client is a much better option for shutting down your headless Pi gracefully rather than yanking the power cord out and risking potential corruption of your microSD card.
Add menu for remote control from mobile phone (optional)
To make it even easier to invoke commands, our last article on controlling a Raspberry Pi from a mobile device also included a bonus section on creating a menu system. You can follow the steps in that article to create a menu system that looks something like this for our current Pandora player project:
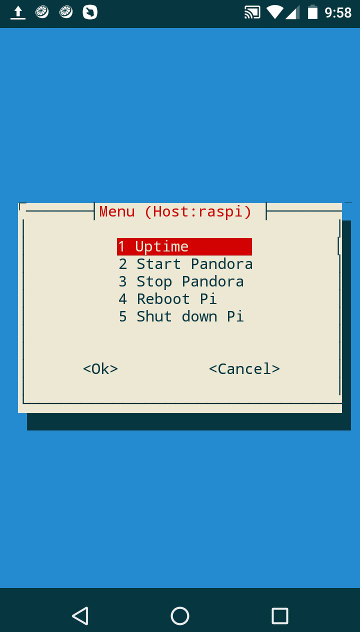
After following the steps in the controlling a Raspberry Pi from a mobile device article, you can create a file called menu2.sh in the same directory as the rmenu command like this:
$ leafpad ~/bin/menu2.sh &
…and add the following contents:
show_menu () {
    # We show the host name right in the menu title so we know which Pi we are connected to
    OPTION=$(whiptail --title "Menu (Host:$(hostname))" --menu "Choose your option:" 12 36 5 \
    "1" "Uptime" \
    "2" "Start Pandora" \
    "3" "Stop Pandora" \
    "4" "Reboot Pi" \
    "5" "Shut down Pi"  3>&1 1>&2 2>&3)

    BUTTON=$?

    # Check if user pressed cancel or escape
    if [[ ($BUTTON -eq 1) || ($BUTTON -eq 255) ]]; then
        exit 1
    fi

    if [ $BUTTON -eq 0 ]; then
        case $OPTION in
        1)
            MSG="$(uptime)"
            whiptail --title "Uptime info" --msgbox "$MSG" 8 36
            show_menu
            ;;
        2)
            pbstart
            msg="Go to http://$(hostname):3000/ to launch the Web interface."
            whiptail --title "Note" --msgbox "$msg" 8 36
            show_menu
            ;;
        3)
            pbstop
            sleep 2
            show_menu
            ;;
        4)
            confirmAnswer "Are you sure you want to reboot the Pi?"
            if [ $? = 0 ]; then
                echo Rebooting...
                sudo reboot
            else
                show_menu
            fi
            ;;
        5)
            confirmAnswer "Are you sure you want to shut down the Pi?"
            if [ $? = 0 ]; then
                echo Shutting down...
                sudo poweroff
            else
                show_menu
            fi
            ;;
        esac
    fi
}
This new menu (menu2.sh) can then be invoked from rmenu as follows:
$ rmenu -m 2
As a final step (as outlined in the previous article), you can add this rmenu -m 2 command to ~/.profile so the menu starts automatically when you SSH into the Pi from your mobile device.
Launch Patiobar automatically on startup (optional)
If you have a dedicated microSD card for your Pandora player, you might want to start Patiobar automatically each time you power on your Raspberry Pi. This makes it easier to, for example, power on a Pi connected to speakers in your living room without the need to SSH into the Pi upon boot to issue a pbstart command. The downside is that you might be playing music and burning Pandora time when you don’t even realize music is playing. 🙂
To start Patiobar automatically every time you boot, use sudo to edit the following file since this file requires root privileges:
$ sudo leafpad /etc/rc.local &
Add the following line just above the last line in the file with the contents of exit 0:
sleep 15 && sudo -iu pi /home/pi/bin/pbstart
The /etc/rc.local script runs every time the Pi boots up. We sleep for 15 seconds before invoking the pbstart command under the aegis of the pi user. The 15 second “nap” 🙂 gives time for the network to stabilize before the pbstart script connects to Pandora.com and begins to stream music.
Save the file and close leafpad. Finally, reboot your Pi.
$ sudo reboot
After the Pi finishes its boot cycle (and another 15 seconds after that), you should start hearing music streaming from Pandora automatically!
Troubleshooting in the future (if music does not play)
Sometime down the road, you may be faced with a situation where music does not play. As a first troubleshooting step, remember that the pbstart command must be run to start Pandora and the web interface. Pay attention to the output of the pbstart command for any errors that appear.
Another potential issue could be that the “TLS fingerprint” associated with the Pandora website has expired. When Pandora updates their SSL certificates, a new TLS fingerprint is needed. Keep this in mind in the future when Patiobar stops working and you can’t figure out why. Revisit this section and update the TLS fingerprint as we will describe now.
First, run pianobar as a standalone program separate from Patiobar to verify this is the issue:
$ pianobar
If you do not hear music, but instead see an error message indicating a “TLS fingerprint mismatch”, proceed with the next steps to resolve this issue.
We first need to copy over a handy script included with the pianobar distribution to our current directory so we can retrieve the latest TLS fingerprint:
$ cp /usr/share/doc/pianobar/contrib/tls_fingerprint.sh .
Next, set the user execute bit to make sure we can run the script:
$ chmod u+x tls_fingerprint.sh
Go ahead and invoke this script to retrieve the TLS fingerprint:
$ bash tls_fingerprint.sh
You should see something like this: FC2E6AF49FC63AEDAD1078DC22D1185B809E7534
Next, edit the pianobar configuration file:
$ leafpad ~/.config/pianobar/config &
Replace the existing tls_fingerprint configuration parameter with the new TLS fingerprint obtained:
tls_fingerprint = FC2E6AF49FC63AEDAD1078DC22D1185B809E7534
Run pianobar to verify that it now works before issuing a pbstart to restart Patiobar:
$ pianobar
You should hear music playing and be back in business!
Conclusion
There you have it! We created an amazing Pandora player that can be controlled remotely from a mobile device. We can control our Pandora listening experience through a web interface. As a bonus, we can also start and stop our Pandora player through an SSH interface on a mobile device with a handy menu as well. We are ready to enjoy music with family and friends—and we learned some cool technology tricks in the process!
Follow @thisDaveJ (Dave Johnson) on Twitter to stay up to date with the latest tutorials and tech articles.
Additional articles
Controlling a Raspberry Pi from a Mobile Device with Bonus Menu Too
Beginner’s Guide to Installing Node.js on a Raspberry Pi
Connecting a Raspberry Pi Using an Ethernet Crossover Cable and Internet Connection Sharing
Upgrading to more recent versions of Node.js on the Raspberry Pi

Good evening. This was a really great article – easy to follow and with good results… to a point.
I do have a problem though and was wondering please if I could source some help to resolve it.
Basically, nothing happening on port 3000.
Any help would be greatly appreciated. 🙂
Greg
Is it possible to run the pianobar instance in a tmux window and be able to access it via an SSH session?
I would love to be able to enjoy Patiobar for the remote control and cover art, but still be be able to use the many controls available via terminal in pianobar.
I see that you can do what I want with ‘screen’ too. Just SSH in to the pandora-Pi and type “screen -r” and you’ll jump right in the running pianobar instance.
State of my Pandoa-Pi:
I am using a Pi 3 running Raspian, as a dedicated headless Pandora Server. It uses an external NuForce uDac2, I disabled the internal sound card and overclock the Pi.
I get no sputters or pops or noises. My setup is a little different, as I run the pianobar as a
service that auto starts at every boot, in a tmux window.
I found that pianobar in ‘screen’ was a bit fragile, ‘tmux’ is a little more robust, still crashes occasionally, when I send a ‘thumbs down’ flag.
You can SSH into the running pianobar tmux instance, and I love having that at my disposal, as well as the Patiobar web gui.
Using the “@reboot” feature of crontab to run a script that launches Patiobar, 15 seconds after the music starts.
I also found a shell script called “piano-ctl” that sends a command to the pianobar fifo, I put that in my path, I can send a key to pianobar from any SSH session.
Also…for headless users…this command at the SSH bash prompt:
$ alsamixer
Brings up a handy volume control. I made an alias for “volume” in my .basrc file…
Super happy with my Pandora-Pi!
Cheers!
Bruce, thanks for sharing the additional innovations you have implemented. These are great tips!
Hello. Thanks for the article, it works for the most part for me. I have a problem with the interface on port 3000; it is not open.
Pbstart and pbstop work just fine; it plays the songs and I get the message to go to the host:3000 but it is not open. Tried with the browser and telnet. Any suggestion on how to troubleshoot this? Thanks!
Is it possible to feed the stream into Icecast (no to actual sound card) to stream it over local network? Any info would be greatly appreciated. Thanks!
John – good question. I have not used icecast, but it appears that it is not compatible with Pandora so I’m not sure how you would accomplish this. The Raspberry Pi 3 includes Bluetooth so you should be able to buy a Bluetooth receiver for a stereo system and stream over Bluetooth to the stereo. Or…just use a longer stereo cable from the Pi to the stereo, if feasible. This may or may not accomplish your goals. Please comment back if you learn something so you can educate us!
when I run pbstart or pbstop I get the following errors:
pi@RASPI:~/Patiobar $ pbstop
bash: /home/pi/bin/pbstop: /bin/bash^M: bad interpreter: No such file or directory
pi@RASPI:~/Patiobar $ pbstop
bash: /home/pi/bin/pbstop: /bin/bash^M: bad interpreter: No such file or directory
Nevermind, when I copied and pasted it brought over the line breaks…
Dave,
I’ve followed your tutorial to the Tee. I’ve got Pandora to start when I type pbstart without any issue. However, when I try to go on the address bar on my computer and phone, it doesn’t work (port forwarding issue). I made sure my router is configured to port forward the pi IP address so that I can do it. But i’m just missing something else. I feel I’m real close to it.
Can you please expand on the web interface portion?
Hi JP, sorry for my delayed response. If you’re still interested in pursuing, the Patiobar interface runs on port 3000 rather than port 80. I’d need more details on your network setup, but you should not need to configure port forwarding if you are hosting Pi on the same network as your computer and phone. Keep in mind your phone will need to be on your local WiFi network for this to work.
As a first step, follow this tutorial I created previously: Solution for Can't Ping Raspberry Pi Hostname on the Network
Assuming your Pi host name is “raspberrypi” you should now be able to “ping raspberrypi” from your computer. You can determine your Pi host name by launching a terminal session on your Pi and typing (without the beginning “$”):
$ hostname
If you still can’t ping your Pi on the network from your computer, try to “ping raspberrypi.local” (assuming the hostname is “raspberrypi”.) If that does not work, get your Pi IP address as follows:
$ hostname -I
You can then ping the IP address and confirm that works. It is best to use the hostname if possible since the IP address can change if you are using DHCP on your local network (as is the default configuration for most home router setups).
After you can successfully ping your Pi on the network you can now (assuming a host name of “raspberrypi”) enter a URL of “http://raspberrypi:3000/” in your address bar or “http://192.168.1.5:3000” (or whatever your IP address happens to be.)
Hopefully this will work for you if you haven’t figured it out already.
Dave,
I can ping the pi from my computer’s command prompt
I can ping the pi’s ip from my computer’s command prompt
my ip is static as far as i’m concerned.
HOWEVER, if I go on a web page and enter the URL, it doesn’t want to access it. I’ve tried it on chrome and internet explorer.
Really odd
Let me know your thoughts
JP
Dave,
Here’s my internet setup
Fios modem (wifi disabled)
Orbi wifi router
2 frequencies (2.4 and 5 GHz)
Raspberry pi has a static IP address.
Hi JP,
On the Pi, you should have a Web server running on TCP port 3000. Verify this by running the following command from the terminal to get a list of the listening TCP ports:
ss -lntThe “-l” is the lower case “L” and not a “one”. On the “Local Address:Port” columns you should see something that ends with “3000”. If not, than the web server is not running, and you may have missed a step in the tutorial.
If the web server is running, see if your Windows machine (I’m assuming it’s a Windows machine) can see the open port on the Pi. Here are the steps:
On the Pi…
– Type “hostname -I” to get its IP address.
On the Windows machine…
– Open a PowerShell prompt
– Type the following (but substitute with the IP address of your Pi): Test-NetConnection -ComputerName 192.168.1.8 -port 3000
– If the port is open, you should see the last line show “TcpTestSucceeded: True” rather than false.
If the Windows machine cannot see port 3000 as open, your Pi may have a firewall in the way that needs to be disabled. It is mostly likely the “ufw” firewall.
Dave,
When I run the ss -lnt command, below is what I’m seeing
:139
:22
:631
:445
:139
:22
:3350
:631
:3389
:445
No :3000 in there. I’m not sure what I missed. I tried again without any luck.
How do I go about enabling web server? Better yet, where in the tutorial should I focus more?
I feel I’m close but I’m still not there.
Thanks for the help
Dave,
I figured it out. the issue was that patiobar was installed incorrectly. I found that it was installed twice.
One thing I also noted was that patiobar web GUI would only work if pbstart was active (something worth noting).
It seems to be stable right now.
I have this setup coupled to a HiFiBerry 2 for my outdoor speakers. I can’t wait for BBQ season in my backyard!
Thanks again for the support!
JP, I’m glad you got it working! Thanks also for sharing your experiences. I updated the troubleshooting section with a note to clarify that pbstart needs to be launched for the web interface to work. Enjoy that music and the BBQ!
have any of you had problems with pianobar – on buster struggling to play music? Even on my pi4 I find no CPU usage but it skips and pops like crazy – that’s with quality on ‘low’
Same here. I have nothing running in the background (out of the ordinary), disabled the desktop on boot, and have plenty of ram/cpu available.
Hi Dave,
Not sure about you but every time I start pianobar, the output is really loud (highest volume)
I am using an hifiberry amp2
Where in your programming can the startup volume be configured? I’d like it to start at 30% for example.
Hi JP, I am not experiencing the high volume issues; however, I have not used the hifiberry. You could control the volume from the command line using the
amixercommand as explained here. If you created apbstartbash script as explained in my tutorial above, you could incorporate theamixercommand into that bash script and adjust the volume back (if needed) at the end by usingamixerin thepbstopcommand.I am sure this is a very good program, I’m having a problem. I would like to remove PATIOBAR and start over, you don’t have any uninstall steps. Can you help me?
After trying several times all i get on the web page is “Patiobar” in the upper left in a band that goes across the top of the page and a set of what looks like controls, nothing plays. I am running a RasPi 3B with Raspberry Pi OS (Buster) it has an ARM7l, I believe.
Anyway, if you get this let me know if you recognize this problem and what may be a solution.
Thanks, Gene
So, I can get Patiobar working by using these two discreet commands – first “screen -S pianobar -d -m pianobar” and second “cd Patiobar && node index.js”. So far nothing I have done with the “pbstart” script will work.
Thanks for these directions! Works great!!! The only issue I ran into using hidden characters in the pbstart and pbstop files due to working from a windows pc rdped into the pi. When I created the files directly on the pi, worked like a charm!
I am stuck at the pbstart. This is what I get.
bash: /home/pi/bin/pbstart: /bin/bash^M: bad interpreter: No such file or directory
Any thought’s?
nevermind
I’m trying to run pbstart and pbstop from crontab but nothing seems to be working.
0 11 * * 1-5 /home/pi/bin/pbstart
0 18 * * 1-5 /home/pi/bin/pbstop
All I see in my syslog is:
Jul 20 11:00:01 Pandora-Pi CRON[4913]: (pi) CMD (/home/pi/bin/pbstart)
No music starts playing and the website isn’t launched either. Any suggestions/corrections I should be doing?
Hello. I am unable to connect to the Pandora site. I have completed editing the config file with what I thought were the appropriate entries for connecting to the Pandora service. When I launch Pianobar, I get the following error messages: Unrecognized TLS fingerprint…Incorrect username or password.
I did run the tls_fingerprint.sh script to have the correct key in the config file. However, that does not seem to have worked. Do you have any suggestions?
Dave – I’ve used pianobar successfully via these instructions for quite a while. I got a new beelink box and would like to duplicate this experience (https://thisdavej.com/creating-a-raspberry-pi-pandora-player-with-remote-web-control/) on the Win11 box. Would you suggest I try to implement via Win11 (there is a Windows pianobar port) or WSL (Windows subsystem for Linux)? Thanks.
I cannot get the TLS_fingerprint to update no matter what I find.
By the look in the comments this project has been mostly forgotten. But I’m going to give it a stab. I have been running this for sometime now. But recently pandora runs for about an hour then stops. I have to restart pandora to get it to play. Again it is only good for an hour.