
It’s easy to install and upgrade Node.js on the Raspberry Pi as explained in my guides on installing Node.js and upgrading Node.js on a Raspberry Pi. In fact, it’s easy on any Linux-based system. For Windows systems, however, the default installation routine of downloading and running MSI files from the Node.js website is not so streamlined. I was not keeping Node.js on my Windows systems up to date due to the activation energy required to do the installations. Today, however, everything changes.
In this article, we will learn how to install and upgrade Node.js on Windows from the command line—and make the ongoing upgrade process as easy as double clicking an icon without any other user intervention required. Let’s jump right in!
Install Chocolatey
Chocolatey is a package manager for Windows that is very analogous to Debian’s APT package management system. We will use Chocolatey to do the heavy lifting while we sit by the sidelines and watch Node.js upgrade right before our eyes. Our first step is to install Chocolatey. You will find detailed installation instructions at the Chocolatey website; however, the installation boils down to these steps:
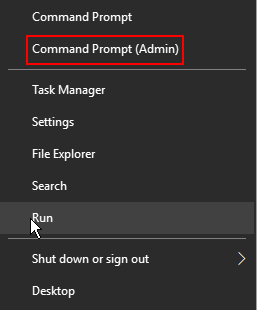
- Hold down the Windows key on your keyboard and select X (Win+X) to activate the Power User Menu in Windows.
- Select
Command Prompt (Admin)to launch a command prompt with elevated (admin) privileges.
- Select
Yeswhen the Windows UAC (User Account Control) prompt appears. (The UAC prompt appears since you are launching a task that requires admin privileges.) - Select and copy the following text:
@"%SystemRoot%\System32\WindowsPowerShell\v1.0\powershell.exe" -NoProfile -InputFormat None -ExecutionPolicy Bypass -Command "iex ((New-Object System.Net.WebClient).DownloadString('https://chocolatey.org/install.ps1'))" && SET "PATH=%PATH%;%ALLUSERSPROFILE%\chocolatey\bin" - Click in the Command Prompt Window and select
Ctrl+Vto paste the script text into the window. - Hit the Enter key to run the script and install Chocolatey.
- After the installation is complete, close the Command Prompt Window since we will need to open a new Command Prompt Window before Chocolatey will be ready to use.
Install Node.js Using Chocolatey
We are ready to install Node.js from the command line!
- Press Win+X on your keyboard to bring up the Power User Menu in Windows.
- Select
Command Prompt (Admin)to launch a command prompt with elevated (admin) privileges. - Select
Yeswhen the Windows UAC (User Account Control) prompt appears. - Enter the following command to install the current version of Node.js on your Windows machine. If Node.js is already installed, it will be upgraded to the latest version.
C:\> choco install nodejs -yNote: To install the LTS (long term support) version of Node.js rather than the shiny new current version, issue this command instead:
C:\> choco install nodejs-lts -y - After the installation completes, close the Command Prompt window.
Let’s test our Node.js installation to confirm it works:
- Press Win+X on your keyboard to bring up the Power User Menu in Windows.
- Select
Command Promptto launch a normal (non-admin) command prompt. - Let’s first see what version of Node.js we are running:
C:\> node -v
v9.8.0
Looks good!
- Next, let’s launch the Node REPL (interactive command prompt) and enter an arithmetic expression:
C:\> node
> 1 + 3
4
> # We can hit Ctrl-C twice to exit the REPL and get back to the bash (shell) prompt.
Excellent – everything is working!
Create a Magic Node.js Upgrade Icon
By this point, you may be asking yourself whether the Chocolatey approach is worth it. We sure did jump through several hoops to get Node.js installed versus simply downloading an MSI file from the Node.js website and clicking through the graphical installer. The fruits of our labor will soon be evident as we create a “magic Node.js upgrade icon” to make all future Node.js upgrades friction free and painless. Here are the steps:
- Create a batch file called
node-upgrade.cmdsomewhere on your system and add the following contents:choco upgrade nodejs -y pause - In Windows Explorer, right click on this new batch file and select
Create shortcut. - Move the newly created shortcut to your Desktop.
- (Optional) Click on the shortcut icon and hit F2 to rename the shortcut. Remove the ” – Shortcut” text from the end of the file name. (Yes, this tailing, superfluous shortcut text drives me crazy.😃)
- Right click on the shortcut icon and select
Properties. - Select
Advanced. - Check the box to “Run as Administrator“`.
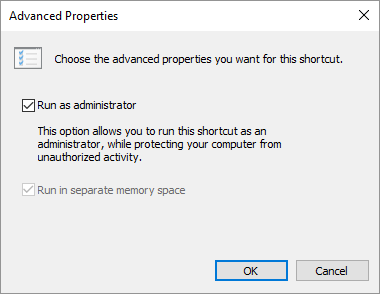
- Select
OKandOKagain.
Your magic icon is complete! Simply double click the icon any time you want to upgrade Node.js on your Windows system. If no updates are available, Chocolatey will inform you that your system is up to date, and your existing Node.js installation will be unaffected.
Uninstalling Node.js Using Chocolatey
If you have a need to uninstall Node.js, you can simply use the built-in Add/Remove Programs (GUI method) of uninstalling Node.js or use Chocolatey to accomplish the goal as follows:
- Press Win+X on your keyboard to bring up the Power User Menu in Windows.
- Select
Command Prompt (Admin)to launch a command prompt with elevated (admin) privileges. - Select
Yeswhen the Windows UAC (User Account Control) prompt appears. - Enter the following command to uninstall Node.js:
C:\> choco uninstall nodejs -y - Enter “Y” when prompted to uninstall
nodejs.installwhich is part of the Chocolateynodejsmeta package.
Conclusion
We are now able to upgrade to newer versions of Node.js without a lot of fuss and ceremony. It’s as simple as double clicking an icon!
Follow @thisDaveJ (Dave Johnson) on Twitter to stay up to date with the latest tutorials and tech articles.
Additional articles
Launching a Windows Command Prompt in a Folder of Your Choice
Guide to Installing Node.js on a Raspberry Pi
Upgrading to more recent versions of Node.js on the Raspberry Pi
Create a Lightweight Raspberry Pi with Raspbian Lite

Superb! This works like a charm. Thank you so much.