
Our friend Freddy Fishman needs our help. He recently launched an aquaponics business to raise fish 🐟 and cultivate underwater plants, and he needs a real-time report to ensure the environmental conditions of his fish tanks are optimized so both his fish and plants can thrive. Another friend of his wired up some Arduino-based fish tank sensors and created a data stream that flows to a local JSON file; therefore, the data foundation is already in place.
Can we help Freddy and his fish farm? I think we’re up for the task! We’ll help Freddy and we’ll help ourselves as we learn how to use Handlebars, a templating library that enables us to keep our views and our code separated, with Node.js.

Article contents
What is Handlebars?
Handlebars is a templating system that enables us to build semantic templates and keep our views and code separated. Many of us have written code like this in the past:
const name = 'Freddy Fishman'
const message = '<p>Hello, my name is ' + name + ' and I am an aquaponics farmer.</p>'
console.log(message);
We intermingle our JavaScript code with our output view code.
Handlebars equips us to separate our code from our views using a template. For example, we can dynamically substitute in name using the following template syntax using curly brackets:
<p>Hello, my name is {{name}} and I am an aquaponics farmer.</p>To help Freddy, we will use Handlebars in Node.js console applications. Our learning will quickly translate over and enable us to use Handlebars in other future contexts such as in Express.js web applications.
Initial Setup
To use handlebars, we first need to set up a project. Here we go!
First, create a folder and navigate into that folder from the terminal.
Run the following command to create a package.json file for Node.js:
$ npm init -yNext, download the handlebars package from NPM and save it as a dependency in your package.json file:
$ npm install --save handlebarsExcellent! We have the foundation in place. We’re on our way to happy 🐠 and happy plants!
Our first template using simple identifiers
Let’s jump right in and create the header for Freddy’s aquaponics report.
const handlebars = require('handlebars');

// Our data source
const data = {
  company: "Freddy's Fish Farm",
  phone: '619-555-1212'
};

// Our template
const source = `
<h1>Aquaponics Report for {{company}}</h1>
<p>Phone: {{phone}}</p>
`;

// Use strict mode so that Handlebars will throw exceptions if we
// attempt to use fields in our template that are not in our data set.
const template = handlebars.compile(source, { strict: true });
const result = template(data);
console.log(result);
Let’s first focus on the template that we created:
const source = `
<h1>Aquaponics Report for {{company}}</h1>
<p>Phone: {{phone}}</p>
`;
Here, Handlebars dynamically substitutes {{company}} with the corresponding company property in our data source and does the same for {{phone}}. These are examples of the simplest Handlebars expressions and are called simple identifiers.
The rest of the code provides the ceremony necessary for Handlebars to compile and process the data through the template. Here is the result that prints to our console:
<h1>Aquaponics Report for Freddy's Fish Farm</h1>
<p>Phone: 619-555-1212</p>Note: I highly recommend that you compile your Handlebars templates in strict mode as shown in the code above. In strict mode, Handlebars will throw exceptions if we attempt to use fields in our template that do not exist in our data set.
Dot-separated paths
Let’s expand our data set to include some nested JSON properties:
const handlebars = require('handlebars');

const data = {
  company: "Freddy's Fish Farm",
  phone: '619-555-1212',
  owner: {
    firstName: 'Freddy',
    lastName: 'Fishman'
  }
};

const source = `
<h1>Aquaponics Report for {{company}}</h1>
<p>Owner: {{owner.firstName}} {{owner.lastName}}</p>
<p>Phone: {{phone}}</p>
`;

const template = handlebars.compile(source, { strict: true });
const result = template(data);
console.log(result);
We utilize dot-separated paths in Handlebars (for example, {{owner.firstName}} in the template above) to access the nested properties in our data set. Here are the console results:
<h1>Aquaponics Report for Freddy's Fish Farm</h1>
<p>Owner: Freddy Fishman</p>
<p>Phone: 619-555-1212</p>HTML Escaping
As we examine the console output above more closely, we see (much to our chagrin) that Handlebars is HTML encoding the apostrophe on one of the lines:
<h1>Aquaponics Report for Freddy's Fish Farm</h1>We can fix our code above by using the triple-stash syntax so that Handlebars won’t escape the value:
const source = `
<h1>Aquaponics Report for {{{company}}}</h1>
<p>Owner: {{owner.firstName}} {{owner.lastName}}</p>
<p>Phone: {{phone}}</p>
`;
Here’s the new console output:
<h1>Aquaponics Report for Freddy's Fish Farm</h1>
<p>Owner: Freddy Fishman</p>
<p>Phone: 619-555-1212</p>
Much better – no more HTML escape characters! Of course, this feature is useful for printing the template results to the console; however, we would typically want to employ the Handlebars default and escape the values if our text will be used in web pages.
Using if block helpers
We can add conditional logic to our handlebars tables using if block helpers:
const handlebars = require('handlebars');

const data = {
  company: "Freddy's Fish Farm",
  phone: '619-555-1212',
  owner: {
    firstName: 'Freddy',
    lastName: 'Fishman'
  },
  rewardsCustomer: true
};

const source = `
<h1>Aquaponics Report for {{{company}}}</h1>
<p>Owner: {{owner.firstName}} {{owner.lastName}}</p>
<p>Phone: {{phone}}</p>
{{#if rewardsCustomer}}
<p>Thank you being a rewards customer with us!</p>
{{/if}}
`;

const template = handlebars.compile(source, { strict: true });
const result = template(data);
console.log(result);
If our customer is a rewards customer, Handlebars will generate text thanking the customer for being a rewards customer:
<h1>Aquaponics Report for Freddy's Fish Farm</h1>
<p>Owner: Freddy Fishman</p>
<p>Phone: 619-555-1212</p>
<p>Thank you being a rewards customer with us!</p>
These templates are powerful!
Likewise, we can use an if/else construct to provide conditional text for both those who are rewards customers and those who aren’t:
const source = `
<h1>Aquaponics Report for {{{company}}}</h1>
<p>Owner: {{owner.firstName}} {{owner.lastName}}</p>
<p>Phone: {{phone}}</p>
{{#if rewardsCustomer}}
<p>Thank you being a rewards customer with us!</p>
{{else}}
<p>Join our rewards program today!</p>
{{/if}}
`;
Separating our template and data into files
In our code above, we have included the data and template inline. As our system grows in complexity, it is a good idea to separate our template and data into distinct files to make it easier to maintain our projects over the long term. Let’s separate out our most recent template and data structure. First, here is our data file:
site1.json
{
  "company": "Freddy's Fish Farm",
  "phone": "619-555-1212",
  "owner": {
    "firstName": "Freddy",
    "lastName": "Fishman"
  },
  "rewardsCustomer": true
}
Next, here’s our template:
report1.hbs
<h1>Aquaponics Report for {{company}}</h1>
<p>Owner: {{owner.firstName}} {{owner.lastName}}</p>
<p>Phone: {{phone}}</p>
{{#if rewardsCustomer}}
<p>Thank you being a rewards customer with us!</p>
{{else}}
<p>Join our rewards program today!</p>
{{/if}}
Finally, here is our modified Node script:
const fs = require('fs');
const handlebars = require('handlebars');

const inFile = './report1.hbs';
const outFile = './report1.html';

const data = require('./site1.json');

const source = fs.readFileSync(inFile, 'utf8');
const template = handlebars.compile(source, { strict: true });
const result = template(data);

console.log(result);

fs.writeFileSync(outFile, result);
console.log(`File written to ${outFile}`);
We use fs.readFileSync to retrieve our template from the file, and we can load our JSON data directly using the Node.js require function. Also, we write the results to an HTML file rather than the console. We’re slowly becoming Handlebars pros with Node.js.
Using each block helpers
It’s time to start preparing the way so we can ultimately process Freddy’s fish tank IoT data with Handlebars. We’ll use the following data file for the next few examples:
site1-tanks.json
{
  "tanks": [
    {
      "name": "Tank 1",
      "waterTemp": {
        "tag": "tank1.temp",
        "highLimit": 80,
        "lowLimit": 76
      }
    },
    {
      "name": "Tank 2",
      "waterTemp": {
        "tag": "tank2.temp",
        "highLimit": 85,
        "lowLimit": 70
      }
    }
  ]
}
Let’s add an each block helper to our template:
tank-reports1.hbs
<table>
    <tr>
        <th>Name</th>
        <th>Value (degF)</th>
        <th>Low Limit (degF)</th>
        <th>High Limit (degF)</th>
    </tr>
    {{#each tanks}}
    <tr>
        <td>{{name}}</td>
        <td>{{waterTemp.tag}} value</td>
        <td>{{waterTemp.lowLimit}}</td>
        <td>{{waterTemp.highLimit}}</td>
    </tr>
    {{/each}}
</table>
We use the each block helper to iterate over each tank in the tanks array and retrieve the various tank properties such as name and waterTemp. The waterTemp property includes nested properties such as waterTemp.tag that we can access too.
To process the template and create our output, we use the following Node.js code:
const fs = require('fs');
const handlebars = require('handlebars');

const inFile = './tanks-report1.hbs';
const outFile = './tanks-report1.html';

const data = require('./site1-tanks.json');

const source = fs.readFileSync(inFile, 'utf8');
const template = handlebars.compile(source, { strict: true });
const result = template(data);

console.log(result);

fs.writeFileSync(outFile, result);
console.log(`File written to ${outFile}`);
This produces the following results in the tanks-report1.html file:
<table>
    <tr>
        <th>Name</th>
        <th>Value (degF)</th>
        <th>Low Limit (degF)</th>
        <th>High Limit (degF)</th>
    </tr>
    <tr>
        <td>Tank 1</td>
        <td>tank1.temp value</td>
        <td>76</td>
        <td>80</td>
    </tr>
    <tr>
        <td>Tank 2</td>
        <td>tank2.temp value</td>
        <td>70</td>
        <td>85</td>
    </tr>
</table>
Our real-time tank sensor report is starting to come together with placeholders for the sensor values!
Using with block helpers
Let’s get a little more advanced and use a with block helper on our data set.
<table>
    <tr>
        <th>Name</th>
        <th>Value (degF)</th>
        <th>Low Limit (degF)</th>
        <th>High Limit (degF)</th>
    </tr>
    {{#each tanks}}
    <tr>
        <td>{{name}}</td>
        {{#with waterTemp}}
        <td>{{tag}} value</td>
        <td>{{lowLimit}}</td>
        <td>{{highLimit}}</td>
        {{/with}}
    </tr>
    {{/each}}
</table>
The with block helper enables us to pass a parameter as a context that is evaluated with the nested properties in our JSON object. This can be helpful for simplifying the syntax of our templates.
The use of the with block helper in this example produces an identical result as the previous example.
Custom Handlebars helpers
The power of Handlebars begins to shine ☀ as we create custom helpers to shape the results of our output. It’s time to start retrieving data from Freddy’s fish tank temperature sensors!

Let’s create a Handlebars helper to help us achieve the goal. First, here’s our sensor data set produced from the Arduino sensors:
site1-tanks-sensor-data.json
{
  "tank1.temp": 77.1,
  "tank2.temp": 86.3
}
That’s simple enough! Let’s create some Node.js code:
const fs = require('fs');
const handlebars = require('handlebars');

const inFile = './tanks-report3.hbs';
const outFile = './tanks-report3.html';

const data = require('./site1-tanks.json');

// Read in the real-time sensor data
const sensorData = require('./site1-tanks-sensor-data.json');

// Create a Handlebars helper to get the sensor value from JSON file
handlebars.registerHelper('getSensorValue', function(tag) {
  return sensorData[tag];
});

const source = fs.readFileSync(inFile, 'utf8');
const template = handlebars.compile(source, { strict: true });
const result = template(data);

console.log(result);

fs.writeFileSync(outFile, result);
console.log(`File written to ${outFile}`);
We read in the real-time sensor data from the site1-tanks-sensor-data.json file. We also create a helper to get the sensor value associated with a tag parameter we pass. Let’s look at our template so that all of this makes more sense:
tanks-report3.hbs
<table>
    <tr>
        <th>Name</th>
        <th>Value (degF)</th>
        <th>Low Limit (degF)</th>
        <th>High Limit (degF)</th>
    </tr>
  {{#each tanks}}
  <tr>
      <td>{{name}}</td>
      {{#with waterTemp}}
      <td>{{getSensorValue tag}}</td>
      <td>{{lowLimit}}</td>
      <td>{{highLimit}}</td>
     {{/with}}
  </tr>
  {{/each}}
</table>
As shown we invoke our getSensorValue helper passing in the value of the tag for each tank:
<td>{{getSensorValue tag}}</td>This helper retrieves the sensor value in our sensor JSON data file structure and yields the current real-time temperature in each fish tank!
This produces the following HTML result:
<table>
    <tr>
        <th>Name</th>
        <th>Value (degF)</th>
        <th>Low Limit (degF)</th>
        <th>High Limit (degF)</th>
    </tr>
  <tr>
      <td>Tank 1</td>
      <td>77.1</td>
      <td>76</td>
      <td>80</td>
  </tr>
  <tr>
      <td>Tank 2</td>
      <td>86.3</td>
      <td>70</td>
      <td>85</td>
  </tr>
</table>
I think Freddy will be happy with our progress, and possibly keep us as friends. 😄
Custom helper to provide conditional formatting
We’re almost done, but we’d like to render our output differently if our fish tank temperatures are either above a high limit or below a low limit that we specify. Let’s create another helper to accomplish this goal:
const fs = require('fs');
const handlebars = require('handlebars');

const inFile = './tanks-report4.hbs';
const outFile = './tanks-report4.html';

const data = require('./site1-tanks.json');
const sensorData = require('./site1-tanks-sensor-data.json');

handlebars.registerHelper('getSensorValueStyled', function(waterTemp) {
  const value = sensorData[waterTemp.tag] || 'value not found';
  let cssClass;
  if (value <= waterTemp.lowLimit) cssClass = 'lowAlarm';
  else if (value >= waterTemp.highLimit) cssClass = 'highAlarm';

  let result;
  if (cssClass == null) {
    result = value;
  } else {
    result = `<span class="${cssClass}">${value}</span>`;
  }

  return new handlebars.SafeString(result);
});

const source = fs.readFileSync(inFile, 'utf8');
const template = handlebars.compile(source, { strict: true });
const result = template(data);

console.log(result);

fs.writeFileSync(outFile, result);
console.log(`File written to ${outFile}`);
As shown, we conditionally add a span tag around the retrieved sensor value with a CSS class if we are in a high alarm or low alarm state. Here’s the associated template that utilizes this helper:
tanks-report4.hbs
<table>
    <tr>
        <th>Name</th>
        <th>Value (degF)</th>
        <th>Low Limit (degF)</th>
        <th>High Limit (degF)</th>
    </tr>
    {{#each tanks}}
    <tr>
        <td>{{name}}</td>
        <td>{{getSensorValueStyled waterTemp}}</td>
        <td>{{waterTemp.lowLimit}}</td>
        <td>{{waterTemp.highLimit}}</td>
    </tr>
    {{/each}}
</table>
We invoke the getSensorValueStyled helper and it does the heavy lifting for us to produce the following results:
tanks-report4.html
<table>
    <tr>
        <th>Name</th>
        <th>Value (degF)</th>
        <th>Low Limit (degF)</th>
        <th>High Limit (degF)</th>
    </tr>
    <tr>
        <td>Tank 1</td>
        <td>77.1</td>
        <td>76</td>
        <td>80</td>
    </tr>
    <tr>
        <td>Tank 2</td>
        <td><span class="highAlarm">86.3</span></td>
        <td>70</td>
        <td>85</td>
    </tr>
</table>
Go find Freddy immediately! His second fish tank is running too hot! 🔥 We can, of course, adjust the limits in the site1-tanks.json file discussed earlier in the tutorial if 86.3 is an acceptable fish tank temperature.
Bringing the final report together
We created the header for Freddy’s report near the beginning of the tutorial and we have now processed the real-time sensor data. Let’s bring it all together in one report so Freddy will be a happy customer. Perhaps he might even pay us or buy us some 🍕 or 🍔 since we are doing such awesome work thanks to Handlebars.
Here’s our data:
site1.json
{
  "company": "Freddy's Fish Farm",
  "phone": "619-555-1212",
  "owner": {
    "firstName": "Freddy",
    "lastName": "Fishman"
  },
  "rewardsCustomer": true
}
site1-tanks.json
{
  "tanks": [
    {
      "name": "Tank 1",
      "waterTemp": {
        "tag": "tank1.temp",
        "highLimit": 80,
        "lowLimit": 76
      }
    },
    {
      "name": "Tank 2",
      "waterTemp": {
        "tag": "tank2.temp",
        "highLimit": 85,
        "lowLimit": 70
      }
    }
  ]
}
site1-tanks-sensor-data.json (Live sensor data)
{
  "tank1.temp": 77.1,
  "tank2.temp": 86.3
}
Let’s modify our Node.js code to synthesize these pieces together:
const fs = require('fs');
const handlebars = require('handlebars');

const inFile = './tanks-report5.hbs';
const outFile = './tanks-report5.html';

const data = {
  site: require('./site1.json'),
  tanks: require('./site1-tanks.json').tanks
};

const sensorData = require('./site1-tanks-sensor-data.json');

handlebars.registerHelper('getSensorValueStyled', function(waterTemp) {
  const value = sensorData[waterTemp.tag] || 'value not found';
  let cssClass;
  if (value <= waterTemp.lowLimit) cssClass = 'lowAlarm';
  else if (value >= waterTemp.highLimit) cssClass = 'highAlarm';

  let result;
  if (cssClass == null) {
    result = value;
  } else {
    result = `<span class="${cssClass}">${value}</span>`;
  }

  return new handlebars.SafeString(result);
});

const source = fs.readFileSync(inFile, 'utf8');
const template = handlebars.compile(source, { strict: true });
const result = template(data);

console.log(result);

fs.writeFileSync(outFile, result);
console.log(`File written to ${outFile}`);
We use the following Handlebars template with CSS styles included:
tanks-report5.hbs
{{#with site}}
<!DOCTYPE html>
<html lang="en">
<head>
    <meta charset="UTF-8">
    <meta name="viewport" content="width=device-width, initial-scale=1.0">
    <meta http-equiv="X-UA-Compatible" content="ie=edge">
    <title>{{company}} Aquaponics Report</title>
    <style>
        body {
            font: normal 14px Arial, sans-serif;
        }
        table {
           border-collapse: collapse;
        }
        table, th, td {
            border: 1px solid black;
            text-align: center;
        }
        span.lowAlarm {
        background-color: yellow;
        }
        span.highAlarm {
        background-color: tomato;
        }
    </style>
</head>
<body>
    <h1>Aquaponics Report for {{company}}</h1>
    <p>Owner: {{owner.firstName}} {{owner.lastName}}<br>
    Phone: {{phone}}</p>
    {{/with}}
    <table>
        <tr>
            <th>Name</th>
            <th>Value<br>(degF)</th>
            <th>Low Limit<br>(degF)</th>
            <th>High Limit<br>(degF)</th>
        </tr>
        {{#each tanks}}
        <tr>
            <td>{{name}}</td>
            <td>{{getSensorValueStyled waterTemp}}</td>
            <td>{{waterTemp.lowLimit}}</td>
            <td>{{waterTemp.highLimit}}</td>
        </tr>
        {{/each}}
    </table>
</body>
</html>
Finally, we invoke our Node.js program and it writes the following results to the tanks-report5.html file:
<!DOCTYPE html>
<html lang="en">
<head>
<meta charset="UTF-8">
<meta name="viewport" content="width=device-width, initial-scale=1.0">
<meta http-equiv="X-UA-Compatible" content="ie=edge">
<title>Freddy's Fish Farm Aquaponics Report</title>
<style>
body {
font: normal 14px Arial, sans-serif;
}
table {
border-collapse: collapse;
}
table, th, td {
border: 1px solid black;
text-align: center;
}
span.lowAlarm {
background-color: yellow;
}
span.highAlarm {
background-color: tomato;
}
</style>
</head>
<body>
<h1>Aquaponics Report for Freddy's Fish Farm</h1>
<p>Owner: Freddy Fishman<br>
Phone: 619-555-1212</p>
<table>
<tr>
<th>Name</th>
<th>Value<br>(degF)</th>
<th>Low Limit<br>(degF)</th>
<th>High Limit<br>(degF)</th>
</tr>
<tr>
<td>Tank 1</td>
<td>77.1</td>
<td>76</td>
<td>80</td>
</tr>
<tr>
<td>Tank 2</td>
<td><span class="highAlarm">86.3</span></td>
<td>70</td>
<td>85</td>
</tr>
</table>
</body>
</html>The Web browser output looks like this:
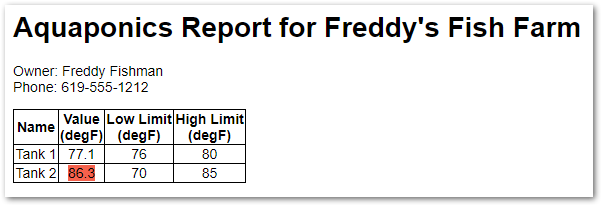
Boom 💥! Our final fish tank IoT report is done—and we learned a lot about Handlebars in the process.
Using Handlebars with Express
If you build Node.js web applications using Express, you can apply all your newfound Handlebars knowledge there too. To get started, create a new folder and navigate to it in the terminal. Issue the following commands:
$ sudo npm install express-generator -g
$ express --hbs
This will create a minimal Express application with support for the Handlebars view engine. There are many Express tutorials on the Internet that can help you take it from there.
Conclusion
Handlebars is indeed a powerful system for creating templates to keep our views and our code separated. Today we have been successful for the following reasons:
☑ Freddy is happy
☑ Freddy’s fish are happy
☑ Freddy’s plants are happy
☑ We are happy because we learned about Handlebars in a real-world context—and had fun too!
Celebrate our success building a complete report for Freddy and go use your knowledge of Handlebars to create other real-world solutions too!
Follow @thisDaveJ (Dave Johnson) on Twitter to stay up to date with the latest tutorials and tech articles.
Additional articles
Using TOML Config Files in Your Node.js Applications
Create a Lightweight Raspberry Pi with Raspbian Lite
Guide to Using Redis with Node.js
Consuming JSON Web Data using Google Sheets
Last updated Apr 03 2018

the most important thing for beginners you forget to mention is names of files where we write codes, i cant stat the project because i font know what files i should creat or write the code in.
Rida, thanks for taking the time to provide feedback regarding the usefulness of including file names next to the code samples. I’ll keep this in mind for future posts.