![]() We’re back with our LTM (Learning through Making) series of Node.js tutorials and we’re gearing up and getting ready to write some code! We’ve learned how to build a Raspberry Pi from the ground up including Node.js, we’ve created a web server in Node without code, and we’ve even managed to get this web server on the Internet as a cool trick.
We’re back with our LTM (Learning through Making) series of Node.js tutorials and we’re gearing up and getting ready to write some code! We’ve learned how to build a Raspberry Pi from the ground up including Node.js, we’ve created a web server in Node without code, and we’ve even managed to get this web server on the Internet as a cool trick.
So how are we going to write Node.js code? There’s nothing that would stop us from simply jumping onto our RasPi and using the Leafpad text editor or even the nano console-based editor to write our code. I propose that we use some more robust tools in the form of an IDE (Integrated Development Environment) to help us along in our coding journey.
It turns out that the RasPi 2 and RasPi 3—in spite of the significant CPU/memory boost they offer over their predecessors—will run most IDEs a bit sluggishly and will be frustrating for any serious Node.js work. I offer here a creative alternative we will use to expedite the software development lifecycle and run the Node.js code natively on the Pi.
In this tutorial, we’re going to use Visual Studio Code for doing Node.js development. Don’t worry if you have another preferred IDE such as Sublime Text or Atom as these steps will be generally applicable. I’m approaching this from the Windows platform, but I believe these steps can be adapted for OS X and Linux platforms as well.
The solution is conceptually simple. We will create a network file share on the RasPi and map the drive on the Windows machine so we can harness the computing power of our Windows machine to write the code. When we are done writing the code, we can then run it natively on either the Windows machine or the RasPi. We’ll see the beauty and versatility of cross-platform JavaScript in action! Let’s get started.
Create Windows File Share on the RasPi
This is one of the steps we completed as part of my Beginner’s Guide to Installing Node.js on a Raspberry Pi so please reference that article if you want a comprehensive guide on the entire RasPi installation.
We will create a Windows file share on the RasPi so we can use our Node.js IDE from our Windows machine directly. Here’s how we do it:
- Launch a terminal session.
- Create a directory called “share” in your home directory as follows:
$ mkdir ~/share
- Issue the following command to launch the Leafpad editor.
$ sudo leafpad /etc/samba/smb.conf &
- We could have also used the console-based nano editor, but Leafpad provides a GUI which is more suitable for beginners. The ampersand on the end of the command launches Leafpad as a background process so we are returned to a shell prompt in the terminal. Also, the smb.conf is part of the Samba package we installed early and this is why it exists on our system.
- Scroll down to the very bottom of the smb.conf configuration file and add the following:
[PiShare]
 comment=Raspi Share
 path=/home/pi/share
 browseable=Yes
 writeable=Yes
 only guest=No
 create mask=0777
 directory mask=0777
 public=no
- Save the changes to the smb.conf configuration file and exit the Leafpad editor. (Raspbian will “automagically” restart the SMB (Samba) services based on the changes you made to the configuration file.)
- Back in a terminal session, we need to create an SMB (Samba) user so we can connect securely from Windows. We will create a user named “pi”, but this will be an SMB (Windows user) rather than the Rasbian “pi” user. Here’s how we do it:
$ sudo smbpasswd -a pi
You will be prompted to enter and re-enter a password. Document this password somewhere for future reference.
We are ready to connect to our newly created RasPi file share from Windows!
- Back on your Windows machine, type the Windows key and “R” (Win-R) to launch a run box for typing in commands.
- Enter two backslashes followed by the name of your RasPi machine (i.e. your Hostname) and hit enter. For example:
\\raspi
- When prompted for credentials, enter the following:
- Username: The format to enter here in Windows parlance is the
domain\username. For us, our domain will be our RasPi hostname and our user name will be “pi”. Therefore, we will enter:raspi\pi(unless you named your RasPi hostname differently.)
If your Hostname is not raspi, you will obviously enter that instead. - Password: (enter the password you created with the smbpasswd command above)
- Username: The format to enter here in Windows parlance is the
- Voilà! We should now be connected. You can test the file share by creating a text file on the Windows side and verifying that it shows up in the /home/pi/share directory on the RasPi side.
Map A Network Drive to the File Share Hosted on the RasPi
Very nice – we have connectivity to the RasPi file share. We will now map a drive to facilitate development so we don’t have to specify the full UNC path each and every time. Feel free to choose a drive letter of your choice. I’m going to choose “P” since the drive we are mapping resides on a “Pi” after all. I like to keep things simple. 🙂
To map a drive, launch Windows Explorer. As one way to do this, use the Windows key on your keyboard to do a Win+E keyboard combination to launch Windows Explorer.
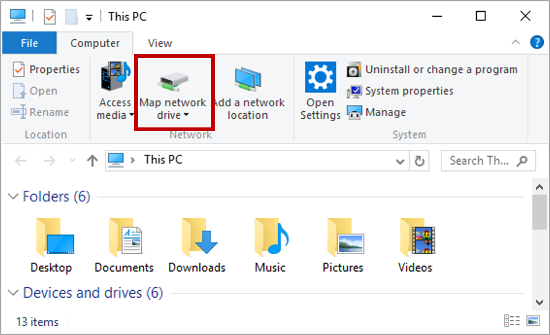
Next, click on the “Map network drive” icon as shown here:
You will then be presented with the following dialog box:
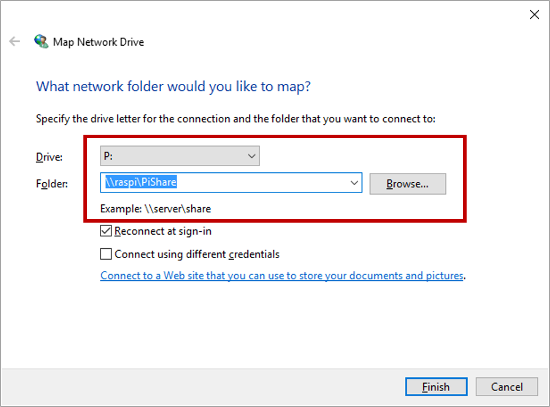
As shown in the screenshot, change the drive letter to “P” or other drive letter of your choice. Enter the UNC path to the RasPi network file share such as “\\raspi\PiShare” . Check the “Reconnect at sign-in” checkbox to ensure the drive is mapped every time you log into Windows. Don’t worry if your RasPi is not always on since Windows will simply keep the icon ready to use when your RasPi is available.
If you are prompted for credentials, remember that the user name is in the format of domain\username. For us, our domain will be our RasPi hostname and our user name will be “pi”. Therefore, we will enter: raspi\pi for the user name (unless you named your RasPi hostname something different.)
You should now be able to double click on your “P” drive in Windows Explorer to launch the Pi network file share. Operating system interoperability amazes me every time; Samba is our friend!
Install Visual Studio Code on Laptop/Desktop Machine
Your next step is to install Visual Studio Code. I have written the Visual Studio Code Jumpstart for Node.js Developers article to assist you. Come back here when you are done with those steps. I’ll be waiting. 🙂
Use Visual Studio Code to Write Node.js Code
You can now launch Visual Studio Code on your Windows (or other) desktop/laptop machine and write some code. We’ll be expounding on this a great deal in future tutorials. For now:
- Create a folder called
myteston the P drive. - In the
mytestfolder, create a file calledindex.jswith the following contents:
console.log('Hello world!');
Save your code and run it from the Windows command prompt:
P:\mytest> node index.js
You should see “Hello world!” printed at the console. This is a bit unimaginative, but it is a good test!
Run Node.js Code on the RasPi
Next, if it is not already open, initiate a remote desktop connection to your RasPi via XRDP (described in my Beginner’s Guide to Installing Node.js on a Raspberry Pi). Launch a terminal session and type the following:
$ cd share/mytest
$ node index.js
You should see “Hello world!”. We have success!
Conclusion
Using this workflow, you will have the full power of your laptop/desktop at your disposal for doing Node.js development work. You can then run your Node.js code natively from either your laptop/desktop or on the RasPi itself. There will be some cases where you will use Node.js native npm modules to read/write from GPIO pins on the Raspberry Pi and these, of course, will only run from the Pi.
That’s it for now. There will be more exciting tutorials on the way!
Follow Dave Johnson on Twitter to stay up to date on the latest tutorials and tech articles.
Related Articles
Beginner’s Guide to Installing Node.js on a Raspberry Pi
Visual Studio Code Jumpstart for Node.js Developers
Learning through Making – Getting Started with Node.js

Leave this kind of big boy stuff for those who have VS Code native running on the Pi.
Hi,
can i import through the described method a VB6 application on raspbian?
Hi Vito – I don’t believe Visual Studio Code supports VB6 development. If you are seeking to run a VB6 application on Raspbian, I recommend that you use Wine as a compatibility layer to run Windows applications on Linux. See this article to get started.
Hi Dave
Thank for this tutorial!
I have some question to you.
Now I am coding on python in VS Code running on my Windows machine for Raspberry Pi.
I add packages for nodejs or python on my raspberry pi. Everything works fine. One problem. I installed vs code extension for python debugging. When I write import in my .py file, VS Code looks for libraries on my PC machine and I get error “Unable import”. How to make VS Code looking for files on raspberry pi? Is it possible?
Thank you
Albert, it sounds like you are running up against some edge cases that don’t work since you are not running VS Code natively on the Pi. I’m guessing the Python debugging isn’t working since VS Code is attempting to run Python on the Windows side since this is where you are running VS Code. Perhaps this article on remote Python debugging will help you. As another option, you can now run VS Code natively on the Raspberry Pi. The instructions are here. Unfortunately the VS Code version provided is version 1.14.0 which was released in June 2017.
Nice, I got it to work but when I edit files with extension “.php”, VS Code doesn’t work. It keeps asking me to compare and every once in a while, VS Code complains it can’t find the PHP server!