 Visual Studio Code is an amazing, lightweight code editor and works great for Node.js development. I like it so much that I am recommending it for those doing the free Learning through Making (LTM) tutorial series I am creating. My Using Visual Studio Code with a Raspberry Pi (Raspbian) article is closely coupled to this article; however, this article is intended to help you develop with VS Code whether you are using a RasPi or not.
Now, let’s get started with first things first. This article is geared toward awesome, cutting edge people who want to develop with Node.js and leverage the latest ES6 (ES2015) features rather than being content living in yesteryear. 🙂 Am I resonating with you and describing who you are or who you want to be? If so, let’s get started.
Install Visual Studio Code
Go to the VS Code Downloads page to download and install the appropriate bits for your platform (i.e. Windows, Linux, or OS X). If you already have VS Code installed, be sure you update your copy since we will be utilizing the latest features of VS Code available at the time of this writing. You did say you aren’t content living in the past, right? 🙂
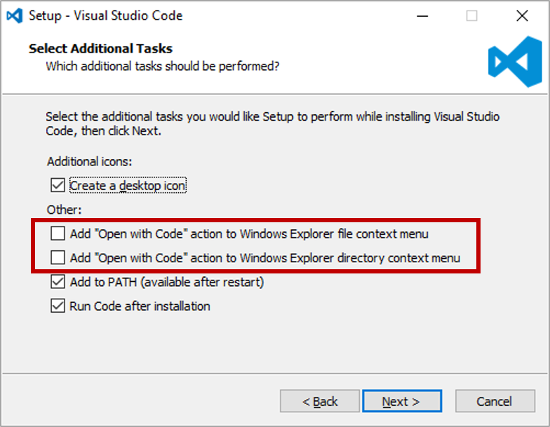
If you are installing VS Code for Windows, be sure to check the two checkboxes shown in the screenshot below. This will give the ability to right click on a folder in Windows Explorer and launch VS Code. These checkboxes are not checked by default.

Provision a Location for your Node.js Projects
That sounds much more technically highfalutin than just creating some folders. We are going to provision our environment!
Go ahead and create a folder for your Node.js projects. In my world, I have created a folder called !projects that resides in the root of my C drive. Due to the “!”, it appears at the top of the C drive. I keep it at the root of the C drive to help avoid issues in Windows with long file paths.
Here is the file path I will be using for the remainder of this tutorial:
c:\!projects\node\test
Go ahead and launch a command prompt and navigate to that location. My Launching a Windows Command Prompt in a Folder of Your Choice article outlines a fast shortcut to accomplish this using Windows Explorer. I use this shortcut all the time!
Install and Initialize ESLint
What is ESLint, you ask? ESLint, as described on the ESLint website, is a “tool for identifying and reporting on patterns found in ECMAScript/JavaScript code, with the goal of making code more consistent and avoiding bugs.” It will help keep us between the ditches and write beautifully, styled code. It can’t guarantee high code quality, but it will help move us along in the right direction.
We will first install ESLint as described in more detail in the ESLint getting started guide. First, we will install ESLint globally using npm:
npm install -g eslint
Next, we will initialize ESLint and tell it our coding style preferences. Be sure you run this command from the root of your project directory since ESLint will create an .eslintrc.json file to save the preferences you provide.
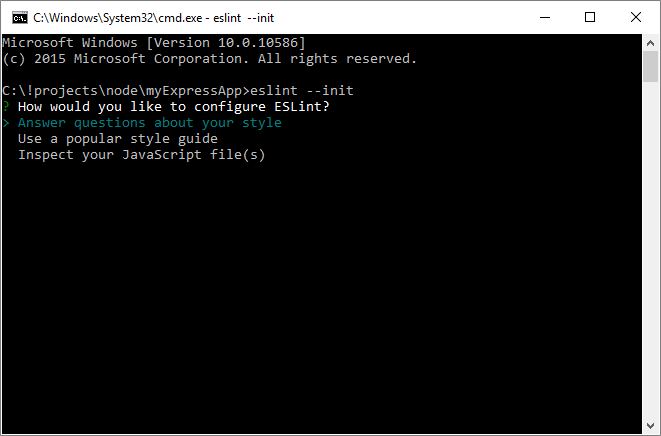
C:\!projects\node\test> eslint --init
After invoking this command, you will then see a screen like this:

Use your arrow keys to navigate through the screens and complete the interview. Here are the questions and recommended answers for the sake of our exercise:
- How would you like to configure ESLint? Answer questions about your style
- Are you using ECMAScript 6 features? Yes (we want to leverage the cool new stuff)
- Are you using ES6 modules? No (We are using CommonJS which is the module format utilized by Node.js)
- Where will your code run? (Ensure arrow is on Node and hit spacebar to select this radio button. Arrow down to Browser and hit spacebar to unselect since are doing pure Node.js development right now. Hit Enter.)
- Do you use JSX? (type “N” for No) – not using this right now and hit Enter
- What type of indentation style do you use? This is an emotionally charged question like vi versus emacs, PC versus Mac, etc. 🙂 I’m going with tabs. You choose what you prefer. Arrow down to select and hit Enter.)
- What quotes do you use for strings? (I recommend single quotes, but this is emotionally charged too. Arrow down and hit Enter.)
- What line endings do you use? (I selected Unix since I am doing development work for the Raspbian on the RasPi which is a Unix-based OS. Select your option of choice.)
- Do you require semicolons? Yes (This is controversial as well, but my preference comes from doing lots of C-family languages such as C/C++/Java/C# where semicolons are not optional.)
- What format do you want your config file to be in? JSON
After completing this interview, you will get feedback that an .eslintrc.json file has been created in the root of your project directory.
Here’s what the .eslintrc.json file will look like:
{
    "env": {
        "es6": true,
        "node": true
    },
    "extends": "eslint:recommended",
    "rules": {
        "indent": [
            2,
            "tab"
        ],
        "linebreak-style": [
            2,
            "unix"
        ],
        "quotes": [
            2,
            "single"
        ],
        "semi": [
            2,
            "always"
        ]
    }
}
We’re going to add a couple more rules to our .eslintrc.json file to make it more complete for our coding preferences. You can check out this ESLint documentation page to learn about all the additional rules available so you can further tweak ESLint to your heart’s content. The rule value syntax is as follows:
0 (zero) = turn the rule off
1 = turn the rule on as a warning (doesn’t affect exit code if invoke ESLint command line tool)
2 = turn the rule on as an error (exit code is 1 when triggered in ESLint command line tool)
Here are the rules we will add:
- no-console: 0 (This will turn off the no-console rule and enable us to use console methods such as “console.log(“Hello”). Disallowing the use of console is considered a best practice for JavaScript in the browser, but we are running Node.js outside of the browser.)
- eqeqeq: 2 (Turn on the eqeqeq rule to ensure we use the type-safe equality operators === and !== instead of their regular counterparts == and !=.)
The final .eslintrc.json file thus looks like this with our two additional rules added at the end:
{
    "env": {
        "es6": true,
        "node": true
    },
    "extends": "eslint:recommended",
    "rules": {
        "indent": [
            2,
            "tab"
        ],
        "linebreak-style": [
            2,
            "unix"
        ],
        "quotes": [
            2,
            "single"
        ],
        "semi": [
            2,
            "always"
        ],
    "no-console": 0,
    "eqeqeq": 2
    }
}
Install the ESLint VS Code Extension
We are now ready to install the ESLint extension so that VS Code will perform linting in real-time as we develop our code. Let’s first launch VS Code from the command prompt:
C:\!projects\node\test> code .
“code” invokes the VS Code executable and the “.” ensures we launch VS Code in the current directory.
To install the extension
- Hit F1 to launch the command palette.
- Type “
extension” and the following will appear:

- Next, select the first option to “Install Extension”.
- A box will appear with “ext install ” and you can add “eslint” as shown here:

- Click on the ESLint blue rectangle to begin the installation.
- After the ESLint extension installation is complete, you will be prompted to restart VS Code. Go ahead and restart VS Code.
As a final step, we must enable the ESLint extension from within VS Code. Here’s how:
- On the VS Code menu go to File | Preferences | User Settings
- Modify the settings file that appears on the right to include the following entries:
// Place your settings in this file to overwrite the default settings
{
 "eslint.enable": true,
 "files.eol": "\n",
 "editor.insertSpaces": false
}
This enables ESLint. The settings in the left pane are the default settings and the settings in the right pane are used to override any default settings desired.
While we were in making changes, we also added overrides for the following default values:
- files.eol – changed to ensure all files we create in VS Code will use Unix style line endings since using for RasPi development. Feel free to omit this setting if you’d rather use the default Windows line ending settings.
- editor.insertSpaces – changed this to false since we are using tabs for our indentation style. You can omit this setting if you are using spaces instead of tabs.
Conduct Additional Configuration to Further Improve the Node.js Coding Experience
We are getting near the finish line! As described in the documentation from Microsoft on setting up Node.js Applications with VS Code, we will invoke the following commands to include some TypeScript definition files to further improve the Node.js coding experience:
C:\> npm install -g typings
C:\> typings install dt~node --global
Finally, create a jsconfig.json configuration file in the root of your project folder to give VS Code additional hints:
{
    "compilerOptions": {
        "target": "es6",
        "module": "commonjs"
    }
}
Conclusion
You now have an amazing development environment for writing Node.js code that includes real-time linting. There are many other VS Code customization options, but this should give you a great start. Create a sample file such as “index.js” and try to write some code. We’ll get rolling on writing some amazing Node.js applications in the future so don’t worry if you don’t know what code to write at this point.
One more important note: Many of the steps we completed were universal, but some must be completed for each new Node.js project you create. Here are the configuration items that must be completed for each new Node.js project:
eslint --init(This must be completed for each project or you can copy the.eslintrc.jsonfile from an existing project to the root of your new project.)- TypeScript definition files – must be installed for each new project.
jsconfig.jsonconfiguration file – must be created or copied to the new project root from an existing project.
We are now positioned to start creating some fun Node.js coding projects. See you next time!
Related Articles
Beginner’s Guide to Installing Node.js on a Raspberry Pi
Using Visual Studio Code with a Raspberry Pi (Raspbian)
Learning through Making – Getting Started with Node.js

3 thoughts on “Visual Studio Code Jumpstart for Node.js Developers”