 Dave Johnson
In my Beginner’s Guide to Installing Node.js on a Raspberry Pi, I equipped you with the knowledge needed to build an awesome Raspberry Pi system that could also run in a headless mode. We’re able to avoid a dedicated monitor, keyboard, and mouse, and this opens a whole new world of possibilities!
This brings us to today’s scenario: you’ve deployed your headless Raspberry Pi in the living room and connected it to your speaker system, soaking in the full stereo sound of your favorite music using pianobar, the console-based Pandora player. It’s eventually time for bed and you’re tired. Should you yank the power cord on your Raspberry Pi and call it a night? Probably not – you might risk corrupting the microSD card. Should you walk upstairs and re-open your laptop so you can SSH into the Pi and safety shut it down? That’s a lot of work! Wouldn’t it be fantastic if you could connect to your Pi from the mobile phone sitting next to you and issue that shutdown -h now command? Controlling your Pi from a mobile device could be very useful in other contexts too beyond listening to music such as IoT applications, computer vision systems, Magic Mirrors, etc.
In this guide, I will teach you how to control your Raspberry Pi from a mobile device. As a bonus, we will create a menu application to make it easier to issue commands since typing complicated command-line syntax on a small screen can prove to be challenging! Let’s jump right in!
Install SSH client on your mobile phone
Install an SSH client on my mobile phone? Are you serious? Yes, I’m serious. Until recently, I had no idea that SSH clients existed for mobile devices—other than perhaps as a novelty. I’ve used the venerable Putty SSH client for Windows, and the OpenSSH client on Linux and OpenBSD. I figured SSH clients must exist for mobile devices, but I never had a context to investigate. Sure enough, SSH clients do exist and I am downright amazed at their usefulness. After all, I wouldn’t be taking the time to write this article for you otherwise. 🙂
Let’s install an SSH client on our mobile device now.
If you are using an Android phone like me, go to the Google Play Store, and search for SSH clients. I chose the JuiceSSH client and have been happy with it.
For iPhone users, find an SSH client that looks awesome and give it a try. The Serverauditor SSH client looks promising; however, I don’t have an iPhone so I could not test it out. Let me know in the comments if you have an SSH client for iOS that you love.
Verify SSH mobile client works
Let’s verify that our SSH mobile client works. First, make sure that you have wi-fi enabled on your mobile device since there is obviously no way to connect to a Raspberry Pi on your local LAN if your mobile device is using a cell connection only, and doesn’t have wi-fi enabled.
Next, fire up your Raspberry Pi. If you have used other methods to connect to it through SSH such as an SSH desktop client, try that first and verify that you can establish communication.
Option 1 – Activate SSH server using graphical interface
If you can’t connect, you may need to enable the SSH server on your Pi as follows:
Launch the Raspberry Pi Configuration which is in the Menu under Preferences.
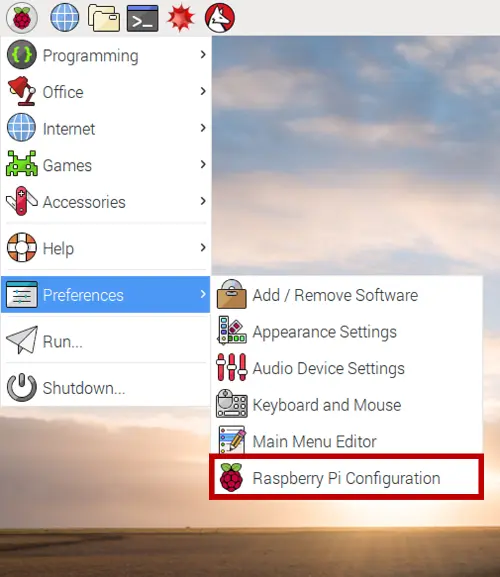
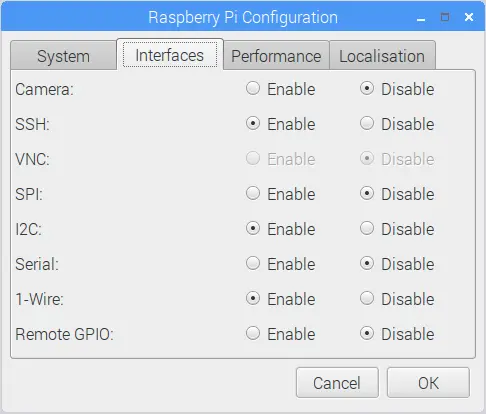
Next, click on the Interfaces tab (as shown below), ensure that SSH is set to Enable, and click OK.
Option 2 – Activate SSH server through the command-line
As an alternative approach, if you want to be a command-line hero, issue the following commands from the terminal instead: 🙂
Check if SSH server is running:
systemctl status ssh
Enable the ssh server to start on boot and start it now if it’s not running:
sudo systemctl enable ssh
sudo systemctl start ssh
Take mobile SSH client for an initial test drive
After the SSH server is up and running (and potentially tested with a desktop SSH client), go ahead and connect to it with the SSH client running on your mobile device. Unless you are hosting highly classified data on your Pi, you may want to go ahead and save the SSH credentials for the pi user in the connection settings, if your SSH mobile client allows for this. I have saved connections for multiple Pi systems in my JuiceSSH client, and this makes it very convenient to launch SSH sessions without typing the passwords on constrained on-screen keyboards each and every time!
You should be seeing a command prompt for your Raspberry Pi. Your world has opened up; just think about the possibilities this could provide!
Go ahead and type some commands and see how it works. For example:
ls
cal
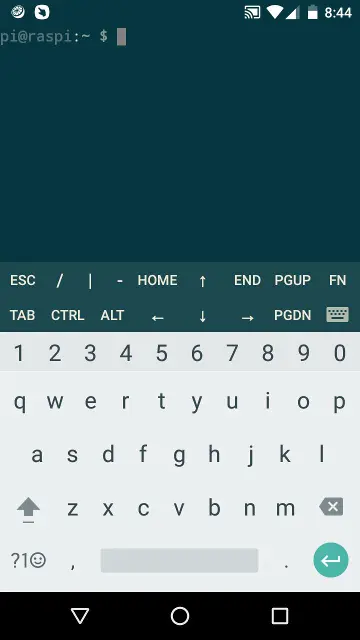
As shown in this screenshot below from my SSH session using the JuiceSSH client, there is a popup keyboard available for typing special characters (CTRL, ALT, TAB, etc.) so you have all the capabilities of a standard keyboard. For JuiceSSH, you must touch the screen in the terminal area first, before the special character popup keyboard appears.
Create menu application for added awesomeness
We’re now able to remote into our Pi from our mobile device, and we’re feeling on top of the world. But wait, there’s more. 🙂 As a bonus, let’s create a menu application to make it easier to invoke commands since, as stated earlier, typing complicated command-line syntax on a small screen can prove to be challenging! Here we go!
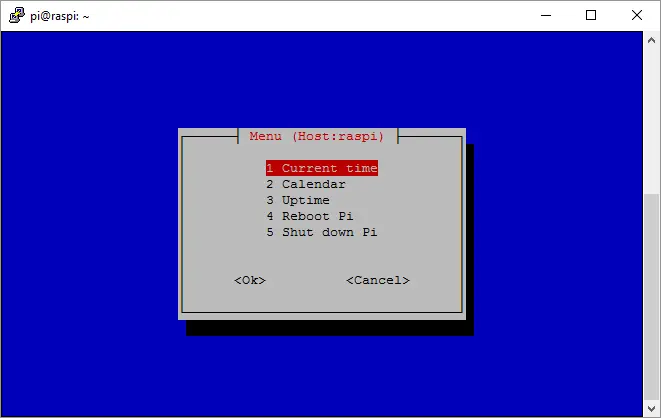
Our ultimate goal is to create a menu that looks like this:
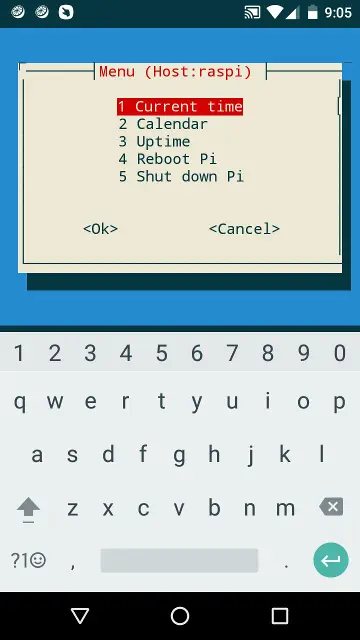
This will enable us to issue commands through a nice menu-based system efficiently and expediently. I will be providing you with the source code to implement the five menu items shown in the screenshot above. You may ultimately implement different menu commands to suit your specific needs. I’m guessing you will at least want to keep the last two commands which are universally applicable since most of us will have a need from time to time to reboot and shut down our Pi systems from our mobile devices. Remember we wanted a way to shut down our Raspberry Pi remotely instead of yanking the power cord and potentially corrupting our microSD card? 🙂 Let’s get on with it and create the menu application!
Create bin directory to make our menu command accessible from any directory
First of all, we will create a directory for our scripts so our scripts can be accessible from any directory on our system without providing a full path name to our script.
Go ahead and launch a terminal session. This will bring you to a command prompt in your home directory (/home/pi).
Next, create a directory called bin:
mkdir bin
We will need to edit our .bashrc file to include this bin directory in our PATH variable. This will ensure that any scripts located in our newly created bin directory can be invoked from any directory on our system without needing to include the full path to the script. Let’s first launch a text editor so we can edit the .bashrc file:
mousepad .bashrc &
Add the following line to the bottom of this file:
export PATH="$HOME/bin:$PATH"
Save your changes and close the Mousepad editor.
To ensure our changes to the .bashrc file are processed right away, invoke this command:
source .bashrc
Perfect! We are now positioned to create our menu command.
Create menu command
We’ll use Mousepad once again to create and edit our new command. We’ll call our command rmenu (remote menu):
cd bin
mousepad rmenu &
Create the rmenu file. You might find it easier to launch this tutorial page using the Web browser on your Raspberry Pi so you can copy and paste the script contents with ease. The latest Pi browser is based on Chromium, after all, and works excellently! I’ve also created a Github Gist containing the rmenu source code.
Add the following contents to the rmenu file:
#!/bin/bash
## USAGE
##   rmenu [options]
##
## DESCRIPTION
##   rmenu (remote menu) displays a user-friendly menu. A typical use case is to
##   display the menu when certain remote hosts connect using SSH. The menu is
##   displayed if the host MAC address is included in an rmenu_hosts file (contained
##   in the same directory as the rmenu script).  The rmenu command is typically
##   added to the user .profile (rmenu -c) so it will be invoked when a user
##   connects remotely through SSH.  To always show the menu no matter what
##   remote host connects, simply invoke rmenu without any parameters.
##
##   This script was originally created to enable a menu to appear when
##   connecting to a Raspberry Pi from an SSH client running on a mobile device.
##   Feel free to use this script and tweak the menu and make it useful for your
##   context!
##
## OPTIONS
##   -c, --conditional    Show menu if remote host is in the rmenu_hosts file.
##                        The rmenu_hosts file needs to be in the same directory
##                        as the rmenu script. If remote host is not coming
##                        through SSH, menu will not be shown either.
##  -m , --menu_num       The menu number to invoke. By default, the menu code in
##                        menu1.sh to display the menu. You can create additional
##                        files in the same directory as rmenu such as menu2.sh
##                        to invoke different menus.
##
##   -h, --help           Display this message.
##
## Example rmenu_hosts file (lines starting with "#" are ignored)
##  # MAC addresses of hosts that should see remote menu when make SSH connection
##  de:57:33:a4:8a:2b
##
## DEPENDENCIES
##   whiptail
##
## IMPLEMENTATION
##   Author: Dave Johnson (https://thisdavej.com/)
##   Copyright: Copyright (c) https://thisdavej.com/
##   License: MIT License (MIT)
##
confirmAnswer () {
    whiptail --title "Confirmation" --yes-button "Yes" --no-button "No"  --defaultno --yesno "$1" 8 36
    return $?
    # returns 0 = yes, 1 = no, 255 = escape key hit
}
# Modify the menu and commands below to suit your needs. On my Android device, five menu items is a good
# number to avoid vertical scrolling.
show_menu_if_host_in_list () {
    # If we are not coming through SSH (we are in through VNC, etc.), $SSH_CONNECTION will not be set.
    # Don't show the menu in this case if someone invokes directly from the terminal.  Most of the time,
    # the rmenu command will be invoked through .profile and .profile is not used when launching terminal
    # sessions from the desktop, only when connecting through an SSH connection.
    if [ -z "$SSH_CONNECTION" ]; then
        clear
        show_menu
        exit
    fi
    DIR="$( cd "$( dirname "${BASH_SOURCE[0]}" )" && pwd )"
    menuhosts_file=$DIR/rmenu_hosts
    if [ ! -f "$menuhosts_file" ]; then
        echo "$menuhosts_file" file not found. Cannot evaluate whether remote host is in the list.
        exit 1
    fi
    declare -a MENU_HOSTS
    MENU_HOSTS=( `cat "$menuhosts_file"`)

    SSH_CLIENT_IP=$(echo $SSH_CONNECTION | awk '{ print $1 }')
    SSH_CLIENT_MAC_ADDRESS=$(arp -an $SSH_CLIENT_IP | awk '{ print $4 }')

    # Make upper case for string comparison
    SSH_CLIENT_MAC_ADDRESS=${SSH_CLIENT_MAC_ADDRESS^^}
    FOUND_MATCH=false
    for i in "${MENU_HOSTS[@]}"
    do
        if [[ "$i" == "#"* ]]; then
            continue
        fi
       if [ "$SSH_CLIENT_MAC_ADDRESS" == "${i^^}" ]; then
            FOUND_MATCH=true
            break
       fi
    done
    if $FOUND_MATCH; then
        clear
        show_menu
    fi
}

usage() {
  [ "$*" ] && echo "$0: $*"
  sed -n '/^##/,/^$/s/^## \{0,1\}//p' "$0"
  exit 2
} 2>/dev/null

MENU_NUMBER=1

while [[ $# -gt 0 ]]
do
key="$1"
case $key in
    -c|--conditional)
    CONDITIONAL=true
    ;;
    -m|--menu_num)
  MENU_NUMBER="$2"
  shift
    ;;
    -h|--help)
    usage
    ;;
    *)
        # unknown option
    ;;
esac
shift # past argument or value
done

DIR="$( cd "$( dirname "${BASH_SOURCE[0]}" )" && pwd )"
source $DIR/menu$MENU_NUMBER.sh

if [ "$CONDITIONAL" = true ] ; then
    show_menu_if_host_in_list
else
    show_menu
fi
Create a second file in the same directory called menu1.sh to store the actual menu code. (This allows us to create multiple menus down the road.)
mousepad menu1.sh &
Add the following contents:
show_menu () {
    # We show the host name right in the menu title so we know which Pi we are connected to
    OPTION=$(whiptail --title "Menu (Host:$(hostname))" --menu "Choose your option:" 12 36 5 \
    "1" "Current time" \
    "2" "Calendar" \
    "3" "Uptime" \
    "4" "Reboot Pi" \
    "5" "Shut down Pi"  3>&1 1>&2 2>&3)

    BUTTON=$?
    # Exit if user pressed cancel or escape
    if [[ ($BUTTON -eq 1) || ($BUTTON -eq 255) ]]; then
        exit 1
    fi
    if [ $BUTTON -eq 0 ]; then
        case $OPTION in
        1)
            MSG="$(date)"
            whiptail --title "Current time" --msgbox "$MSG" 8 36
            show_menu
            ;;
        2)
            # We use "ncal -h" to turn off highlighting of today's date since
            # highlighting produces non-printable chars that don't look good.
            whiptail --title "Calendar" --textbox /dev/stdin 13 26 <<<"$(ncal -bh)"
            show_menu
            ;;
        3)
            MSG="$(uptime)"
            whiptail --title "Uptime info" --msgbox "$MSG" 8 36
            show_menu
            ;;
        4)
            # For sensitive commands, we make sure they must press extra keys
            confirmAnswer "Are you sure you want to reboot the Pi?"
            if [ $? = 0 ]; then
                echo Rebooting...
                sudo reboot
            else
                show_menu
            fi
            ;;
        5)
            confirmAnswer "Are you sure you want to shut down the Pi?"
            if [ $? = 0 ]; then
                echo Shutting down...
                sudo poweroff
            else
                show_menu
            fi
            ;;
        esac
    fi
}
There’s a lot going on in these scripts, and we’ll explain its functionality as we progress. At its core, the rmenu script displays a user-friendly menu.
As one last step to ensure our new rmenu command is ready to use, set the user execute bit:
chmod u+x rmenu
Test menu command
Go ahead and launch the rmenu command now. I’m launching mine from a desktop SSH client (Putty) to start, but you can launch from your mobile device, if desired. Also, it does not matter which directory you launch the rmenu command from since the ~/bin directory is part of your PATH now.
rmenu
You should see a menu appear on your screen as shown here:
 As a side note (explained in the usage area of the script source code above), you could also create a menu with different contents by creating a file called
 menu2.sh in the same directory as the rmenu script. You could then launch this second menu instead of the default menu (menu1.sh) like this:
rmenu -m 2
That’s some bonus information that might come in handy sometime! Let’s get back to our current context.
Let’s navigate through the menu together to learn how it works. Our mouse does not work in this context and thus we must rely on our keyboard only.
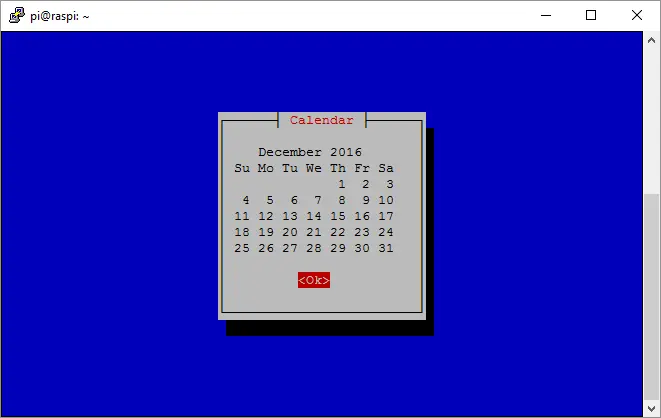
Press the down arrow key to select Calendar and then press the Enter key to select that option. Bam! You should see a calendar like this:
 To “press” the
 Ok button, hit the Enter key. This will return you to the main menu.
Next, use the down arrow key to navigate down to the Reboot Pi option. Hit the Enter key to select this option. You should see the following screen:
 Use your
 left and right arrow keys to select between the “Yes” and “No” options. Hit the Enter key to make your selection. You could also press the Escape key to return to the main menu.
Back on the main menu, you can hit the Escape key to exit the menu, or use your Tab key or right arrow key to navigate to the Cancel button, and then hit the Enter key.
Here’s a summary of the keys used for menu navigation:
- up/down arrow keys: move through the menu items
Enterkey: select a menu item- left/right arrow keys (or
Tabkey): Select between different options such as the “Yes” and “No” options
Ensure menu command only appears when launched from your mobile device
Our rmenu command includes some special sauce that can be used to only display the menu when certain remote hosts connect through SSH. That’s explore that functionality now:
For starters, we need to know the MAC address of our mobile device which is probably not obvious. Launch an SSH session into your Pi from your mobile device. From another screen, such as a remote desktop session into your Pi (where the screen is bigger and easier to read), invoke the following command:
arp -an
This will give you an “arp table” showing the names of the hosts (and their corresponding MAC addresses) that have recently connected to your Pi. Lo and behold, you should see your mobile device name listed there!
Next, create a file called rmenu_hosts in the same directory as your rmenu script:
mousepad ~/bin/rmenu_hosts &
Add your mobile device host MAC address in this file. Here’s an example file I created (with dummy host names) which also demonstrates that you can use “#” to comment out host names or other lines that should be ignored when the rmenu script processes the rmenu_hosts configuration file:
# MAC addresses that should see the menu when log in via SSH
de:57:33:a4:8a:2b
Save the file. Let’s give it a test and confirm that rmenu will only conditionally display the menu if certain hosts connect. Keep in mind that the menu will always be displayed if connections are made from a non-SSH connection such as in a VNC or Remote Desktop session. Invoke the following command from your mobile phone (the “-c” shows the menu “conditionally”):
rmenu -c
Sure enough, you should see the menu appear! If you launch an SSH connection through another host such as your laptop and issue the same command, the menu should not appear since only the host name of your mobile device is listed in the rmenu_hosts file.
Hit the Escape key to exit the menu, and type the following to disconnect the SSH session on your mobile device:
exit
Update .profile so rmenu is launched with each SSH connection
After everything is working to your satisfaction, the final step is to add the rmenu command to the .profile file in your home directory so it is launched every time a user connects through SSH and logs in as the pi user. Here’s how we do it:
mousepad ~/.profile &
Add the following line at the bottom of this file:
rmenu -c
Save the file and close mousepad.
To confirm this works, connect to your Pi from the SSH client running on your mobile device. The menu should appear, and you are in control of your Pi!
Conclusion
We are now equipped and ready to control our Raspbery Pi systems from mobile devices! As a bonus, we also created a menu application to make it even easier to control the Pi, and shut down our Pi safely rather than yanking the power cord and potentially corrupting our microSD card. Feel free to modify the script and add your own menu commands!
Join us next time as we put this menu to use and create a Pandora music player for our Raspberry Pi that includes a handy Web interface we can use from our mobile device!
Follow @thisDaveJ (Dave Johnson) on X to stay up to date with the latest tutorials and tech articles.