 Dave Johnson
In Create a Web Server in Node without any Code, we used the http-server npm module to create a web server and serve up files in record time. Today I will share a way you can take the web server you built and make it available beyond your local network and on the public Internet. This is cool trick, but I recommend that you use this with caution as this will open a hole in your router/firewall when you make your web server available to the world. Let’s get started!
Create simple Node.js web server
We’ll start by creating a simple web server in Node.js. See Create a Web Server in Node without any Code for a few more details, but here’s a high level review of the core steps needed to create and host a quick web server using Node.js. As an alternative, you can create a web server using NGINX or other web server of choice if desired. We want to get a web server up and running so we can move on to the next step and serve HTTP content from our Pi to the public Internet.
Install Node.js on your Raspberry Pi following the steps in my Beginners Guide to Installing Node.js on a Raspberry Pi. See here for the Node.js specific installation steps.
Install the
http-servernpm package globally so it is available as a command anywhere on the RasPi rather than just in the current directory:sudo npm install -g http-serverCreate a Public directory in the root of your home directory and navigate to that directory:
mkdir ~/Public && cd ~/PublicIf we are trying to up our game in the command-line arena, we could have also used the bash
$_expression which expands to the last argument of the previous command. (This is/Publicfrom the previousmkdircommand in this context.)mkdir ~/Public && cd $_Create a basic web page using an editor such as Mousepad or nano or paste the following in the terminal to circumvent the editor. Be sure to hit the Enter key after pasting the command.
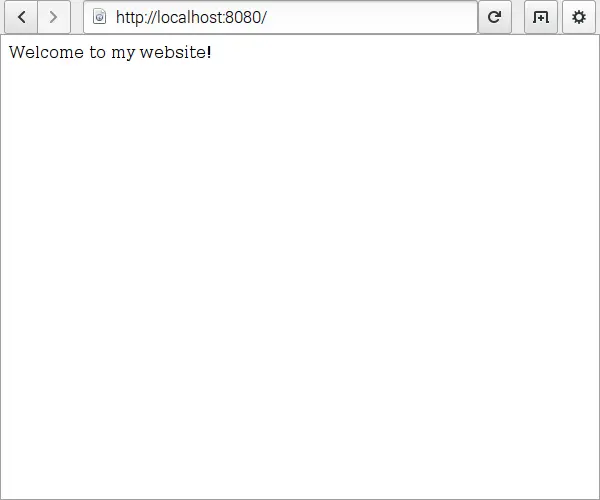
$ cat << EOF > index.html
<html>
<head>
    <title>Welcome</title>
</head>
<body>
    Welcome to my website!
</body>
</html>
EOF
Launch the web server:
$ http-server
Starting up http-server, serving ./
Available on:
  http://127.0.0.1:8080
  http://192.168.1.5:8080
Hit CTRL-C to stop the server
How cool is that? One simple command and we are up and running with a web server and serving our newly minted HTML file.
Launch the web browser included with Raspbian and enter the following URL in the address bar:
http://localhost:8080It works! This Node http-server package is pure genius, and it is super simple to use.
Make RasPi Web Server Available on the Internet with ngrok
Now that we have a web server running on port 8080, let’s make it available on the Internet with the help of ngrok, a tool for exposing local servers behind NATs and firewalls to the public internet over secure tunnels.
While we could download the grok binary from the grok website, we’ll use a Node.js npm package to streamline the installation process.
Open a new terminal window since the previous terminal window is already running our web server.
Install the
ngrokpackage as a globally available executable. We need to install with the--unsafe-permflag to enable the underlying ngrok package to run its postinstall script as root to download and save the ngrok binary in the global node_modules folder.sudo npm install --unsafe-perm -g ngrokStart up ngrok to tunnel http traffic from the outside world to our web server running on localhost port 8080 of our RasPi.
$ ngrok http 8080
ngrok by @inconshreveable                                                     (Ctrl+C to quit)

Session Status                online
Account                       thisDaveJ (Plan: Free)
Version                       2.2.8
Region                        United States (us)
Web Interface                 http://127.0.0.1:4040
Forwarding                    http://3c0a6e01.ngrok.io -> localhost:8080
Forwarding                    https://3c0a6e01.ngrok.io -> localhost:8080

Connections                   ttl     opn     rt1     rt5     p50     p90
                              0       0       0.00    0.00    0.00    0.00
We are up and running! You can now use the “Forwarding” address listed to navigate to your RasPi web server running on localhost port 8080 from the public Internet.
To test, launch a web browser on your phone (assuming it is not connected to your local Wi-Fi network) to prove that you can access your RasPi web server. Based on my context here, I would enter one of the following URLs in the address bar:
http://3c0a6e01.ngrok.io

https://3c0a6e01.ngrok.io
Bam! The
ngroktool has enabled us to make our RasPi hiding behind our NAT firewall available on the public Internet.Note: As a bonus tip, ngrok provides a web interface you can launch at http://127.0.0.1:4040 from within your RasPi to inspect the request headers and other aspects of the traffic being served up through the ngrok tunnel
Enter
Ctrl+Cto terminate the ngrok tunnel connection.
Install ngrok-notify so we can send the tunnel URL via email
We’d like to be able to reboot our RasPi and automatically start both our web server and the ngrok tunnel, so we can visit our web server over the Internet. The problem is that we currently need to launch ngrok manually and read the ngrok tunnel “forwarding” URL which changes every time we launch ngrok. How will we solve this dilemma?
Fortunately for you and for me, I have developed an npm package called ngrok-notify to help us overcome these obstacles. 😄
Install the
ngrok-notifypackage as a globally available executable. Once again, we need to install with the--unsafe-permflag to enable the underlying ngrok package to run its postinstall script as root to download and save the ngrok binary in the global node_modules folder.sudo npm install --unsafe-perm -g ngrok-notifyNote: An npm install of ngrok-notify will also install ngrok so it it not necessary to install ngrok separately
Create an ngrok directory in the root of your home directory and navigate to that directory:
mkdir ~/ngrok && cd $_Modify your Gmail account (or create a separate Gmail account for sending messages) and configure it for less secure apps. This is needed so the underlying npm module used by ngrok-notify for sending email (Nodemailer) can send email using Gmail. See also the Nodemailer notes on using Gmail.
Copy the starter configuration files into this directory:
$ ngrok-notify init
Added file: .env
Added file: config.yml

Please update config.yml and .env with your info so you can send an email through GMail.
As shown in the command output, the
initcommand adds a couple of configuration files used byngrok-notifythat we can modify for our needs.Edit the
config.ymlfile and add email recipients and your Gmail user name. (We support Gmail only rather than other email providers since Gmail is ubiquitous and relatively easy to configure.) Lines starting with “# are treated as comments and ignored. Here is the file that is generated by default:ngrok: # Optional parameters #subdomain: alex # reserved tunnel name https://alex.ngrok.io #region: us # one of ngrok regions (us, eu, au, ap), defaults to us email: recipients: - [email protected] #- [email protected] subject: ngrok URL for {proto} on port {port} message: "The ngrok URL for {proto} on port {port} is: {url}" # Gmail credentials user: [email protected] # This password is used if you don't set one in the .env file. The .env location is recommended. password: mySecretPasswordHereAs a side note, keep in mind that we can also utilize email to send SMS (text) messages. For example, to send a text message to 610-555-1234, you can simply send an email message to [email protected], assuming the cell phone number is a T-Mobile subscriber. See this page for a list of SMS email addresses used by many carriers.
Edit the
.envfile and enter your Gmail password:GMAIL_PASSWORD=myRealPasswordHere ### Optional sections below ### ##auth = "user:pwd" # http basic authentication for tunnel #NGROK_AUTH= ## authtoken from ngrok.com #NGROK_AUTHTOKEN=Launch
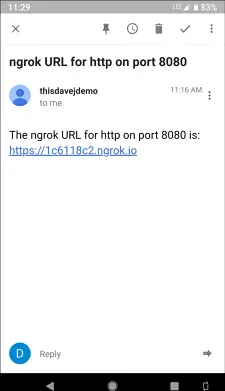
ngrok-notifyto create an ngrok http tunnel to expose port 8080 running on the localhost to the world. (Please ensure you launch this command from the directory containing thengrok-notifyconfiguration files you just modified above.)ngrok-notify http 8080An ngrok tunnel on the Internet will be created and the ngrok URL will be printed to the console. Additionally, ngrok-notify will send you an email with the ngrok URL. Very awesome!
Here is the email I received:
Review the
ngrok-notifyhelp information to understand the additional capabilities available:$ ngrok-notify --help Create ngrok tunnel to expose localhost to the web and notify with ngrok URL Usage: ngrok-notify PROTO PORT [-n] ngrok-notify init [-f] Positional arguments: PROTO Protocol to use in the ngrok tunnel {http,tcp,tls} PORT Port number of the localhost service to expose (e.g. 8080) init Copy starter config files into directory for customizing Optional arguments: -n, --noemail Do not send an email providing the URL of the ngrok tunnel -h, --help Show help -v, --version Display version information -f, --force Overwrite config files in directory if they exist. Notes Email messages are sent using the settings in the config.yml file and the Gmail password stored in the .env file. Examples Create ngrok tunnel to expose localhost web server running on port 8080. Email is sent with the ngrok URL since "--noemail" is not included. $ ngrok-notify http 8080 Create ngrok tunnel to expose localhost web server running on port 8080, but don't send email. $ ngrok-notify http 8080 -n
Configure the web server and ngrok tunnel to launch automatically using pm2
We’re into the final stretch! In this section, we’ll use the awesome pm2 tool to keep our web server and ngrok tunnel alive forever. Every time we reboot our RasPi, pm2 will start up both the web server and the ngrok tunnel using ngrok-notify and we will receive an email with the new ngrok tunnel URL every time it changes. PM2 has many other awesome features including load balancing, but we’ll keep focused on our immediate use case in this tutorial.
Install the latest stable version of
pm2as a global executable:sudo npm install -g pm2@latestNavigate to the directory containing our web content we want to serve on the Internet:
cd ~/PublicIf you are still running
http-serverin another terminal, go to that terminal window and invokeCtrl+Cnow to kill the process.Start
http-serverwith pm2:pm2 start http-serverRunning the above command will start the
http-serverand add the process to pm2’s list of processes to manage and keep alive forever.Navigate to the directory containing the
ngrok-notifyconfiguration files:cd ~/ngrokStart
ngrok-notifywith pm2:pm2 start ngrok-notify -- http 8080Please note that we need to include the “–” to enable us to pass additional arguments to
pm2.List the current processes managed by
pm2. You should see a process for thehttp-serverandngrok-notify.$ pm2 list ┌──────────────┬────┬─────────┬──────┬──────┬────────┬─────────┬────────┬──────┬───────────┬──────┬──────────┐ │ App name │ id │ version │ mode │ pid │ status │ restart │ uptime │ cpu │ mem │ user │ watching │ ├──────────────┼────┼─────────┼──────┼──────┼────────┼─────────┼────────┼──────┼───────────┼──────┼──────────┤ │ http-server │ 0 │ N/A │ fork │ 2002 │ online │ 0 │ 26s │ 0.1% │ 33.9 MB │ pi │ disabled │ │ ngrok-notify │ 1 │ N/A │ fork │ 2008 │ online │ 0 │ 26s │ 1.6% │ 37.7 MB │ pi │ disabled │ └──────────────┴────┴─────────┴──────┴──────┴────────┴─────────┴────────┴──────┴───────────┴──────┴──────────┘ Use `pm2 show <id|name>` to get more details about an appIf you made a mistake and need to kill and re-create a process, use the
pm2 deletecommand. For example, to kill the first process:pm2 delete 0… and then issue another
pm2 startcommand.Create a system startup script so pm2 will launch on system reboot.
$ pm2 startup
[PM2] Init System found: systemd
[PM2] To setup the Startup Script, copy/paste the following command:
sudo env PATH=$PATH:/usr/bin /usr/lib/node_modules/pm2/bin/pm2 startup systemd -u pi --hp /home/pi
As instructed, copy and paste the command given to create a startup script. The instructions for my system are shown above as an example.
Please note that
pm2 startupmerely creates a startup script and only needs to be invoked once. The list of apps inpm2 listcan be modified at any time usingpm2 deleteto remove processes andpm2 startto add processes. The processes listed inpm2 listwill be restarted whenever you reboot your machine or if they die unexpectedly while your machine is up.Reboot your machine.
PM2 should automatically start both the
http-serverandngrok-notifyprocesses. You should also receive an email with the new ngrok tunnel URL.If you no longer want PM2 to start automatically on system boot, issue the following command:
pm2 unstartup
Copy and paste the command provided to prevent pm2 from starting automatically on subsequent system boots.
PM2 is an amazing tool! You can visit the PM2 home page to learn more. Also, they have this handy cheat sheet highlighting additional functionality that is available.
Conclusion
We accomplished a lot in a short amount of time! To review, we:
- Created a web server on our Raspberry Pi using the Node
http-serverexecutable. - Hosted this web server on the Internet for people outside our NAT/firewall to visit using ngrok.
- Added the ability to receive an email containing the ngrok tunnel URL using ngrok-notify.
- Configured our Raspberry Pi to automatically start our web server, ngrok tunnel, and send us an email using pm2.
I hope you learned some new things today and had fun too!
Follow @thisDaveJ (Dave Johnson) on X to stay up to date with the latest tutorials and tech articles.